Quantcast
Channel: Code On Time
Viewing all 336 articles
Browse latest View live

Passing Business Rule Properties to Stored Procedures

$
0
0

Code On Time generator allows creating data controllers from the result set of a stored procedure. Some stored procedures use parameters in order to perform operations on the data. In the Northwind sample database, the [Employee Sales By Country] stored procedure shows total sales amounts grouped by employee, and then by country. It accepts two parameters, @Starting_Date and @Ending_Date to determine the filter.

Let’s create a controller from this stored procedure and pass parameters to the script via properties in the BusinessRules class of the app.

This picture shows the results of the stored procedure with @Beginning_Date and @Ending_Date parameters returned by a business rule property.

Employee Sales by Country stored procedure results filtered by a business rule property.

The CREATE script for the stored procedure can be seen below.

CREATE procedure [dbo].[Employee Sales by Country] 
@Beginning_Date DateTime, @Ending_Date DateTime AS
SELECT    Employees.Country, 
        Employees.LastName, 
        Employees.FirstName, 
        Orders.ShippedDate, 
        Orders.OrderID, 
        "Order Subtotals".Subtotal AS SaleAmount
FROM Employees INNER JOIN 
    (Orders INNER JOIN "Order Subtotals" ON Orders.OrderID = "Order Subtotals".OrderID) 
    ON Employees.EmployeeID = Orders.EmployeeID
WHERE Orders.ShippedDate Between @Beginning_Date And @Ending_Date

Creating the Controller

Start the Project Designer. In the Project Explorer, switch to the Controllers tab. Click on the New Controller icon on the toolbar.

Creating a new controller.

Enter a name for the controller.

PropertyValue
NameEmployeeSalesByCountry

Press OK to save. Right-click the new controller and press “Generate From SQL…”.

Generating the controller from an SQL script.

In the SQL script textbox, paste in the following script. The debug section is removed from the business rule when the application framework executes the script at runtime and declares the business rule properties as SQL parameters.

-- debug
DECLARE @BusinessRules_BeginningDate datetime,
        @BusinessRules_EndingDate datetime
-- end debug

EXEC [dbo].[Employee Sales by Country]
    @BusinessRules_BeginningDate,
    @BusinessRules_EndingDate

Press OK to generate the controller.

Adding Controller To Page

Next, let’s add the controller to a page. Right-click on the controller and press Copy.

Copying the EmployeeSalesByCountry controller.

Switch to the Pages tab in the Project Explorer. On the toolbar, press the New Page icon.

Creating a new page in the project.

Give a name to the page and press OK to save.

PropertyValue
NameEmployee Sales By Country

Drop the new page to the right side of Home page node to place it second in the site menu.

Dropping a page to the right side of Home page node.     Employee Sales By Country page placed after the Home page node in the site menu.

Right-click on the page and press Paste to instantiate the controller as a data view on the page.

Pasting on the Employee Sales By Country page.     The EmployeeSalesByCountry controller has been added to the page as a data view.

Adding Business Rule Property

Let’s create two properties in the BusinessRules class. These properties will return a DateTime value that will be picked up and used by the query to filter the results. If the user is in role “Administrators”, it will display all records between 1970 and 2000. Otherwise, no records will be displayed.

On the Project Designer toolbar, press Browse to first generate the web app. Then, press Develop to open the solution in Visual Studio.

In the Solution Explorer on the right side, right-click on App_Code folder and press Add | Class.

Adding a new class to the project.

Assign a name of “EmployeeSalesByCountryProperties” and press OK to create the file. Replace the contents of the file with the following:

C#:

using System;

namespace MyCompany.Data
{
    public partial class BusinessRules
    {
        public static DateTime BeginningDate
        {
            get
            {
                if (Controller.UserIsInRole("Administrators"))
                    return new DateTime(1970, 1, 1);
                else 
                    return DateTime.Now;
            }
        }

        public static DateTime EndingDate
        {
            get
            {
                if (Controller.UserIsInRole("Administrators"))
                    return new DateTime(2000, 1, 1);
                else
                    return DateTime.Now;
            }
        }
    }
}

Visual Basic:

Imports Microsoft.VisualBasic

Namespace MyCompany.Data
    Partial Public Class BusinessRules

        Public ReadOnly Property BeginningDate As DateTime
            Get
                If Controller.UserIsInRole("Administrators") Then
                    Return New DateTime(1970, 1, 1)
                Else
                    Return DateTime.Now
                End If
            End Get
        End Property

        Public ReadOnly Property EndingDate As DateTime
            Get
                If Controller.UserIsInRole("Administrators") Then
                    Return New DateTime(2000, 1, 1)
                Else
                    Return DateTime.Now
                End If
            End Get
        End Property

    End Class
End Namespace

Make sure to save the file.

Viewing the Results

Press Ctrl+F5 to start the app without debugging. Log in as an administrator and navigate to the Employee Sales By Country page. Notice that all 809 records are displayed.

All employee sales are displayed.

Log out, and log in again as a user. Notice that no records are displayed.

No employee sales are displayed.


Passing Parameter to Stored Procedure using a Custom Search Dialog

$
0
0

Code On Time apps offer the ability to display the results of a stored procedure. Some stored procedures require passing an SQL parameter in order to perform manipulations on the data.

In the Northwind sample database, the [Employee Sales By Country] stored procedure shows total sales amounts grouped by employee, and then by country. It accepts two parameters, @Starting_Date and @Ending_Date to determine the filter.

Let’s create a controller from this stored procedure. By default, the stored procedure will display all records between the years 1970 and 2000. In addition, we will add a custom action that will allow the user to specify the Beginning and Ending dates via a custom confirmation controller.

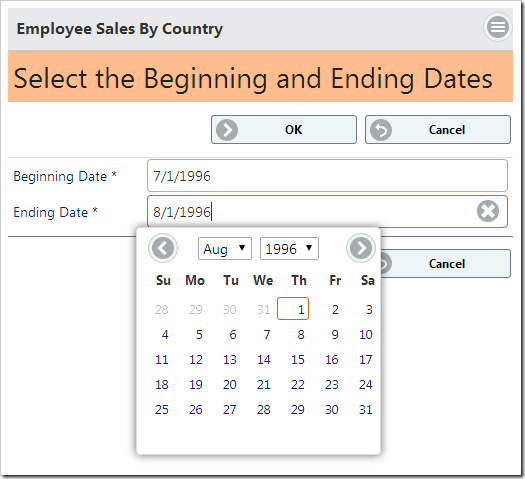
The picture below shows the confirmation controller form allowing the user to specify parameters for the stored procedure.

The confirmation controller form allows the user to select a beginning and ending date to pass to the stored procedure.

The CREATE script for the stored procedure can be seen below.

CREATE procedure [dbo].[Employee Sales by Country] 
@Beginning_Date DateTime, @Ending_Date DateTime AS
SELECT    Employees.Country, 
        Employees.LastName, 
        Employees.FirstName, 
        Orders.ShippedDate, 
        Orders.OrderID, 
        "Order Subtotals".Subtotal AS SaleAmount
FROM Employees INNER JOIN 
    (Orders INNER JOIN "Order Subtotals" ON Orders.OrderID = "Order Subtotals".OrderID) 
    ON Employees.EmployeeID = Orders.EmployeeID
WHERE Orders.ShippedDate Between @Beginning_Date And @Ending_Date

Creating the Controller to Display the Stored Procedure

Start the Project Designer. In the Project Explorer, switch to the Controllers tab. Click on the New Controller icon on the toolbar.

Creating a new controller.

Enter a name for the controller.

PropertyValue
NameEmployeeSalesByCountry

Press OK to save. Right-click the new controller and press “Generate From SQL…”.

Generating the controller from SQL.

In the SQL script textbox, paste in the following script. The debug section is removed from the business rule when the application framework executes the script at runtime and declares the parameters.

-- debug
DECLARE @Parameters_BeginningDate datetime,
        @Parameters_EndingDate datetime
-- end debug

if (@Parameters_BeginningDate is null)
    set @Parameters_BeginningDate = '1970'if (@Parameters_EndingDate is null)
    set @Parameters_EndingDate = '2000'EXEC [dbo].[Employee Sales by Country]
    @Parameters_BeginningDate,
    @Parameters_EndingDate

Press OK to generate the controller.

Adding Controller To Page

Next, let’s add the controller to a page. Right-click on the controller and press Copy.

Copying the 'EmployeeSalesByCountry' controller.

Switch to the Pages tab in the Project Explorer. On the toolbar, press the New Page icon.

Adding a page to the app.

Give a name to the page and press OK to save.

PropertyValue
NameEmployee Sales By Country

Drop the new page to the right side of Home page node to place it second in the site menu.

Dropping a page to the right of the Home page node.     Employee sales by country page is now second in the site menu.

Right-click on the page and press Paste to instantiate the controller as a data view on the page.

Pasting onto the 'Employee Sales By Country' page.     The EmployeeSalesByCountry controller has been instantiated as a view on the page.

Adding the Custom Action

Switch back to the Controllers tab in the Project Explorer. Right-click on EmployeeSalesByCountry / Actions / ag3 (ActionBar) – New node, and press New Action.

Creating a new action in the 'EmployeeSalesByCountry' controller.

Specify the following values:

PropertyValue
Command NameSearch
Header TextFilter View
Confirmation

_controller=FilterEmployeeSales
_title=Select the Beginning and Ending Dates

Press OK to save the action.

Creating the Confirmation Controller

Let’s add a controller that will allow the user to specify BeginningDate and EndingDate parameters for the stored procedure.

On the Project Explorer toolbar, press the New Controller icon.

Adding a new controller to the project.

Enter a name for the controller.

PropertyValue
Name

FilterEmployeeSales

Click OK to save the controller. Right-click on FilterEmployeeSales / Fields node, and press New Field.

Adding a new field to the 'FilterEmployeeSales' controller.

Define the field as follows:

PropertyValue
NameBeginningDate
TypeDateTime

Save the field, and create a second field with these values:

PropertyValue
NameEndingDate
TypeDateTime

Save the EndingDate field. The confirmation controller is now complete.

Viewing the Results

On the Project Designer toolbar, press Browse. In the browser window that will open, navigate to the Employee Sales By Country page. Note that all 809 records are displayed.

All 809 records are displayed on the 'Employee Sales By Country' page.

In the sidebar or context menu, press Filter View action. The page will navigate to a form with the Beginning Date and Ending Date fields. Enter values, and press OK.

The confirmation controller form allows the user to select a beginning and ending date to pass to the stored procedure.

Note that the parameters have been passed to the stored procedure and there are only 17 records displayed now.

The BeginningDate and EndingDate parameters have been set by the confirmation controller.

Improving Performance Of Reports in ASP.NET 4.0 and 4.5 Applications

$
0
0

Microsoft Report Viewer is the lightweight reporting engine used by generated apps to produce data reports in PDF, Word, Excel, and TIFF format. A generated app creates an in-memory table of data sorted and filtered according to the end user criteria. The data table is passed to Report Viewer to produce a report. The design template of the report is either created on-the-fly by the application framework or supplied by a developer at design time.

Report Viewer allows including formulas written in Visual Basic in the definitions of property expressions in various elements of a report template. The report formulas from the template are compiled to executable code by Report Viewer. If an ASP.NET web application tries to create a  report with the help of Microsoft Report Viewer, then certain security requirements must be satisfied. The formulas compiled by Report Viewer must run in “sandbox” environment.

ASP.NET security configuration has changed starting with ASP.NET 4.0. Now the sandbox of Report Viewer is required to jump through many hoops in order to produce a report. This results in poor performance of reports  on large datasets requiring significantly more time to complete rendering.

A simple solution exists to overcome this problem in an app created with Code On Time.

1) Select the project name on the start page of the app generator and choose Settings.

2) Proceed to Web Server Configuration and paste the following snippet into Web.Config modification instructions box:

AppendChild: /configuration/system.web

<trust legacyCasModel="true"/>

3) Click Finish and regenerate the project. A new <trust…/> entry will be created in the configuration file of application.

Now the reporting performance will become significantly improved.

Producing Reports in Binary Format

$
0
0

Application end users download the data reports by selecting menu options in the user interface.

Standard reporting options in an app with Touch UI produced with Code On Time application generator.

The report is produced in the requested format on the server and streamed back to the client browser. The report data is automatically filtered and sorted exactly as displayed to the end user.

A report produced in Microsoft Word format by an app with Touch UI created with Code On Time application generator.

Application developers may need to produce a report on the server with arbitrary filters and sort expression in response to the user actions. The report data file may be stored in the database, archived in the file system, or sent as an email attachment. Application framework offers a simple method that allows to do just that.

Consider the following sample business rule.

C#:

using System;
using System.Data;
using System.Collections.Generic;
using System.Linq;
using System.Text.RegularExpressions;
using System.Web;
using System.Web.Security;
using MyCompany.Data;
using MyCompany.Handlers;using System.IO;
using MyCompany.Web;
namespace MyCompany.Rules
{
    public partial class CustomersBusinessRules : MyCompany.Data.BusinessRules
    {

        /// <summary>
        /// This method will execute in any view for an action
        /// with a command name that matches "Custom" and argument that matches "ProduceReport".
        /// </summary>
        [Rule("r100")]
        public void r100Implementation(string customerID, string companyName, string contactName,
            string contactTitle, string address, string city, string region, string postalCode,
            string country, string phone, string fax)
        {
            // This is the placeholder for method implementation.
            ReportArgsargs = new ReportArgs();
            // controller
            args.Controller = "Orders";
            // sort expression
            args.SortExpression = "OrderDate desc";
            // data filter
            args.Filter = new FieldFilter[] {
                new FieldFilter  {
                    FieldName = "CustomerID",
                    Operation = RowFilterOperation.Equal,
                    Value = customerID
                }
            };
            // filter details
            args.FilterDetails = "This report has been produced on the server for customer " + companyName;
            // produce report in binary format
            byte[] reportData = Report.Execute(args);
            // save report to the local file system
            File.WriteAllBytes(Path.Combine(
                Environment.GetFolderPath(Environment.SpecialFolder.MyDocuments), "Test.pdf"),
                reportData);
            // report the MIME type and file extension that go with the binary data
            Result.ShowAlert("MIME: {0}, Extension: {1}", args.MimeType, args.FileNameExtension);
        }
    }
}

Visual Basic:

Imports MyCompany.Data
Imports System
Imports System.Collections.Generic
Imports System.Data
Imports System.Linq
Imports System.Text.RegularExpressions
Imports System.Web
Imports System.Web.Security
Imports MyCompany.Handlers
Imports System.IO
Imports MyCompany.Web
Namespace MyCompany.Rules

    Partial Public Class CustomersBusinessRules
        Inherits MyCompany.Data.BusinessRules

        '''<summary>
        ''' This method will execute in any view for an action
        ''' with a command name that matches "Custom" and argument that matches "ProduceReport".
        '''</summary>
        <Rule("r100")> _
        Public Sub r100Implementation(ByVal customerID As String, ByVal companyName As String,
                                      ByVal contactName As String, ByVal contactTitle As String,
                                      ByVal address As String, ByVal city As String,
                                      ByVal region As String, ByVal postalCode As String,
                                      ByVal country As String, ByVal phone As String, ByVal fax As String)
            'This is the placeholder for method implementation.
            Dim args As ReportArgs= New ReportArgs()
            ' controller
            args.Controller = "Orders"
            ' sort expression
            args.SortExpression = "OrderDate desc"
            ' data filter
            args.Filter = New FieldFilter() {
                New FieldFilter With {
                    .FieldName = "CustomerID",
                    .Operation = RowFilterOperation.Equals,
                    .Value = customerID
                    }
                }
            ' filter details
            args.FilterDetails = "This report has been produced on the server for customer " + companyName
            ' produce report in binary format
            Dim reportData As Byte() = Report.Execute(args)' save report to the local file system
            File.WriteAllBytes(Path.Combine(
                Environment.GetFolderPath(Environment.SpecialFolder.MyDocuments), "Test.pdf"),
                reportData)
            ' report the MIME type and file extension that go with the binary data
            Result.ShowAlert("MIME: {0}, Extension: {1}", args.MimeType, args.FileNameExtension)
        End Sub
    End Class
End Namespace

The code is executed in response to a custom action Produce Report selected in the context menu of application.

Custom action used to invoke a 'Code' business rule in an app with Touch UI creatd with Code On Time application builder.

Static method Report.Execute performs a server-side execution of the standard report action. The custom implementation of the “Code” business rule displays details about the produced binary data array.

Information about MIME type and file extension reporting by a business rule after producing a report in PDF format in an app with Touch UI.

This sample saves the report data to My Documents folder of the server computer. Here is the actual report.

This report has been generated by a custom action with the help of Report.Execute method invoked by custom business rule in an app with Touch UI produced with Code On Time.

Instance of a class ReportArgs exposes several properties that control the report rendering on the server.

PropertyDescription
ControllerSpecifies the name of the data controller.
ViewSpecifies the ID of the data controller view that will be used to produce data.
SortExpressionDefines a sort expression that determines the order of data rows passed to the reporting engine for processing.
FilterDefines an array of filters applied to the report data passed to the reporting engine for processing.
FilterDetailsSpecifies the optional message displayed below the report header in standard reports.
FormatSpecifies the format of the output. The default format is Pdf. Other options are Word, Excel, and Image.
Template NameSpecifies the name of the custom report template. If left blank, then a standard template is automatically created by application framework.
MimeTypeIndicates the MIME type of the report data produced by Microsoft Report Viewer. Use this property when sending report as an email attachment.
FileNameExtensionIndicates the file name extension that matches the data produced by Microsoft Report Viewer. Use this property to provide a correct extension for the file name.

Reports at Attachments in Email Business Rules

$
0
0

Application framework allows generating reports on the server. This capability makes it possible to produce reports as attachments of email business rules.

Consider the following Email Business Rules implementing a simple notification executed in response to Update command in Categories data controller.

PropertyValue
Command NameUpdate
TypeEmail
PhaseAfter
Script
Host: smtp.gmail.com
Port: 587
UserName: YOUR_EMAIL_ADDRESS@gmail.com
Password: PASSWORD
EnableSSL: true

From: "Sales Admin" <YOUR_EMAIL_ADDRESS@gmail.com>To: RECIPIENT@northwind.com
Subject: Category "{CategoryName}" has changed!

Dear Admin,

This product category has been changed.
See attachment for category product details.

System Monitor

<attachmenttype="report">
    <name>{CategoryName}</name>
    <controller>Categories</controller>
    <view>editForm1</view>
    <filter>
        <item>
            <field>CategoryID</field>
            <operator>=</operator>
            <value>{CategoryID}</value>
        </item>
    </filter>
</attachment>
<attachmenttype="report">
    <name>{CategoryName} Products</name>
    <controller>Products</controller>
    <sortExpression>UnitPrice desc</sortExpression>
    <filter>
        <item>
            <field>CategoryID</field>
            <operator>=</operator>
            <value type="Int32">{CategoryID}</value>
        </item>
    </filter>
</attachment>

Note the two attachment elements embedded directly in the email message. Each element defines a snippet of XML markup describing the report execution arguments.

The first attachment is produced for Categories data controller. Data is filtered by CategoryID of the modified record. The report is produced for editForm1 view.

The second attachment is produced for Products data controller. Data is filtered by CategoryID and sorted in descending order of Unit Price. The report is produced for grid1 view.

Note the field names of the updated data record referenced in curly braces. Expressions {CategoryName} and {CategoryID} are replaced with the actual values during processing.

Attachment definitions are removed from the email body by application framework. The framework will generate each report using specified arguments and attach the report to the email before it is sent out to the recipient.

Run the application and edit any category. Click OK button to save the changes.

An email business rule will trigger an email notification with two report attachments produced in a Touch UI app created with Code On Time application generator.

The data will be saved after a slight delay.

Check your smart phone device for messages.

An email notification on an Android device generated by an Email Business Rule of an app produced with Code On Time.

This is how the email message may look.

The text of the email notification produced by an Email Business Rule in an app created with Code On Time applicaition generator.

Click on an attachment to see the report data in a PDF reader installed on your device.

An attachment report with Category details displayed in Adobe Reader on an Android device.

An attachment report with a list of Products in changed category displayed in Adobe Reader on an Android device.

Sending Emails with SQL Business Rules

$
0
0

Email business rules offer a simple and effective mechanism of creating email notifications for various workflow tasks. For example, a simple notification can be sent out when a new customer account is created. Another example is a notification with attached PDF reports triggered by an update of a product category record.

An email business rule is a static text-based template with placeholders matched to a data controller action command name and execution phase. The template may also include XML-based attachment instructions. A single email notification is generated by application framework when an email business rule is matched to a command activated by application user. Template placeholders are replaced with the field values of the affected data row. If the multiple selection mode is enabled, then a separate notification is generated for each selected data row. Here is an email business rule that produces a notification with two attachments for Categories controller.

An email business rule selected in Project Designer of Code OnTime app generator.

The text of the email business rule script template is shown next. The data value placeholders are highlighted.

Host: smtp.gmail.com
Port: 587
UserName: YOUR_EMAIL_ADDRESS@gmail.com
Password: PASSWORD
EnableSSL: true

From: "Sales Admin" <your_email_address@gmail.com>
To: RECIPIENT@northwind.com
Subject: Category "{CategoryName}" has changed!

Dear Admin,

This product category has been changed.
See attachment for category product details.

System Monitor

<attachment type="report">
    <name>{CategoryName}</name>
    <controller>Categories</controller>
    <view>editForm1</view>
    <filter>
        <item>
            <field>CategoryID</field>
            <operator>=</operator>
            <value>{CategoryID}</value>
        </item>
    </filter>
</attachment>
<attachment type="report">
    <name>{CategoryName} Products</name>
    <controller>Products</controller>
    <sortExpression>UnitPrice desc</sortExpression>
    <filter>
        <item>
            <field>CategoryID</field>
            <operator>=</operator>
            <value type="Int32">{CategoryID}</value>
        </item>
    </filter>
</attachment>

If a specific notification cannot be expressed with a static text template, then consider using SQL business rules to compose an email by writing notification text in the programming language of the database engine.  Database programming languages, such as T-SQL of Microsoft SQL Server, offer enough flexibility to compose a notification of any complexity.

SQL business rules are text-based scripts executed by the database engine. The scripts may include references to data controller fields, properties of BusinessRules class associated with the data controller, URL arguments, and session variables. Developers reference any of these resources as parameters that do not have to be explicitly declared in the scripts.

Application framework binds these “pre-defined” parameters to the corresponding resources, executes the script, collects the output parameter values, and ignores any datasets that may have been produced when the script was executed.

A special mechanism exists in the application framework to force it to pay attention to the output of the SQL business rule script. The developer must supply two business rules that are matched to the same command. The first business rule triggers the “awareness” mode of the application framework. The second business rule produces a dataset that will be captured by the framework. Application framework copies the output data to an instance of System.Data.DataTable class and assigns it to BusinessRules.EmailMessages property. The property implementation iterates over the data table rows and treats each row as a notification that must be sent out. The column names of the table, such as “Port”, “To”, “From”, “Subject”, and “Body” allow the framework to compose correct email messages. The message “awareness” mode is automatically turned off when the last email has been sent.

Here is an example of data controller with two SQL business rules that will generate an email with report attachments when a product category has been updated.

A data controller with two SQL business rules that will generate email notifcations in Touch UI application created with Code On Time.

The first SQL business rule is very simple

PropertyValue
TypeSQL
Command NameUpdate
PhaseAfter
Script
set @BusinessRules_EnableEmailMessages = 1

The script of the this rule assigns value True to the BusinessRules.EnableEmailMessages property of Boolean type and does nothing else. The implementation of the script may do any other type of processing if needed.

The mode of email message awareness is activated now!

The second SQL business rule will produce a singe data row. The script has a “debug” section that declares parameter values used for testing. Application framework will remove this section at runtime  before asking the database server to execute the script. The highlighted fragments are the output column names.

PropertyValue
TypeSQL
Command NameUpdate
PhaseAfter
Script
-- debug
declare @CategoryID int
declare @CategoryName nvarchar(5)
select @CategoryName = 'Confections', @CategoryID = 1
-- end debug

declare @CrLf as varchar(2)
select @CrLf = char(13)+ char(10)

select 
-- from 
    'YOUR_EMAIL_ADDRESS@gmail.com'"From",
    -- to
    'RECIPIENT@nothwind.com'"To",
    -- subject
    'Category "'+ @CategoryName + '" has changed'"Subject",
    -- body
    'Dear Admin'+ @CrLf + @CrLf +
    'This product category has been changed.'+ @CrLf +
    'See attachment for category product details.'+ @CrLf + @CrLf +
    'System Monitor'+ @CrLf  +
    -- attachment 1
    '<attachment type="report">'+ 
    '<name>'+ @CategoryName + '</name>'+
    '<controller>Categories</controller>'+ 
    '<view>editForm1</view>'+
    '<filter>'+ 
        '<item>'+
              '<field>CategoryID</field>'+
              '<operator>=</operator>'+ 
              '<value>'+ cast(@CategoryID as varchar) + '</value>'+
        '</item>'+
    '</filter>'+
    '</attachment>'+    
    -- attachment 2
    '<attachment type="report">'+ 
    '<name>Products in '+ @CategoryName + '</name>'+
    '<controller>Products</controller>'+ 
    '<sortExpression>UnitPrice desc</sortExpression>'+
    '<filter>'+ 
        '<item>'+
              '<field>CategoryID</field>'+
              '<operator>=</operator>'+ 
              '<value type="Int32">'+ 
cast(@CategoryID as varchar) +
'</value>'+ '</item>'+ '</filter>'+ '</attachment>'"Body"

Note that STMP parameters, such as Port and Password are omitted from the script. Application framework will use default SMTP settings from the application configuration file. If any of these parameters are needed to be in the message definition, then make sure that the values are included as the corresponding column names (for example, Host, UserName, etc.)

This particular implementation uses @CrLf parameter to inject end-of-line characters in the message. The entire message body is a single concatenated string of text. A real-world implementation may compose the text by iterating through cursors and executing multiple select statements.

If an HTML output is desired then the corresponding tags should be included in the “Body”.

Developers can return any number of “messages” in the output when needed. This may be accomplished by creating a temporary database table and populating it with the messages. The contents of the temporary table are selected when the job is done. Another alternative is to use UNION of several SELECT statements to send a fixed number of messages at once.

This is a sample email notification produced by SQL business rules from the example above.

An email notification with two report attachments produced by Touch UI app created with Code On Time.

Reports as Email Attachments, Data Views without Extenders, Azure SDK 2.4

$
0
0

Code On Time release 8.0.8.0 introduces the following features and fixes.

  • Implemented support for attachments in Email Business Rules. Multiple xml tags <attachment/> can be specified in the body of the email template.
     
  • Added SMTP settings to Features page of Project Wizard
     
  • Report handler now supports static method Report.Execute to enable generation of report data on the server. The method accepts filter, sort expression, controller, view, template name, and output format as parameters.
     
  • SQL business rules can generate emails. This allows creating multiple complex emails with optional attachments using the full power of SQL dialect of the database engine.
    1) First, a business rule must set EnableEmailMessages property of the business rules class.
    2) Next, another business rule executing in the same sequence will return a list of data rows with columns titled as "To", "Subject", "Body", etc. to produce a list of outgoing emails.
     
  • Desktop and Touch UI now support parsing of "data-" attributes to enable initialization of data views from user controls without using server-side tags. This feature will be the core capability in http://cloudontime.com virtual pages. We are also considering replacing DataViewExtender references with the new “data-” attributes in the generated pages. For example, a master detail relationship between Categories and Products can be declared with this snippet of XML:
    <div id="categories" data-controller="Categories" data-show-in-summary="true"></div>
    <div id="products" data-controller="Products" 
        data-filter-fields="CategoryID" data-filter-source="categories"></div>
    
       
  • Generate from SQL will include byte fields if "base Table Name" is specified. Base table name will be used to create the controller to ensure the labels make sense.
     
  • Updated "Generate From SQL..." function to add up to 1000 data fields to grid1.
     
  • Added ability to "not create controllers automatically" when creating a new project. This will create a database object filter of "__none" and will not create any controllers.
     
  • If multiple views are available, then page header is not displayed in grid/list below the tabs representing view names in Touch UI apps.
     
  • Touch UI recognizes data-content-framework attribute on custom pages to enable upcoming support for built-in CMS (content management system). The future supported values are "bootstrap" and "" (empty string).
     
  • Custom pages do not fire appscroll events to improve performance of long “bootstrap” pages.
     
  • Wide and Tall pages will disabled sidebar and page header in Touch UI applications.
     
  • First virtual page of the data app will not display  a page header
     
  • Custom controls can use data-page-header attribute to set up the text of the page header in Touch UI apps. The page header is inherited from activator label (if any) and will not be displayed if it matches the first page.
     
  • Azure SDK 2.4 is now supported in Azure Factory project type.
     
  • Implemented enhanced processing of Azure SDK references to prevent duplicates created after Azure SDK upgrade. Azure Factory project do not include a reference to Azure Storage for Azure SDK 2.4. It must be added manually when needed.
     
  • Negative search with quick find now requires a space in front of the sample. So the search sample "to-do" will not be treated as "positive 'to' and negative 'do'".
     
  • Moved resetting of Result.Canceled to beginning of SelectedValue loop to allow PreventDefault on each individual selected row in business rules executed for data view with multiple row selection.
     
  • Report handler uses a more robust method of figuring the base URL of application to ensure correct image URLs in reports.
     
  • Application framework adds "order by row_number__" to "SELECT" requests to ensure consistent results on multi-processor machines running SQL Server. Thank you Patrick Saunders and fgary6861!
     
  • The contents of "virtual" pages marked as data-app-role="page" is wrapped in a div with class app-page-content. This significantly improves the rendering of Bootstrap content pages in CMS.
     
  • Touch UI: Settings menu displays "Settings" label.
     
  • Touch UI: Action Group menus of actions display header text of action group as a header for the panel.
     
  • Touch UI: Method $app.mobile.navigate navigates to a virtual page. The method must be used when programming custom virtual pages to complete navigation.
     
  • Touch UI: The framework will not auto-enhance virtual pages marked as data-enhance="false".
     
  • Touch UI: Custom user controls can implement "delayed" transitions to pages if remote data is required to display the page. The tutorials are coming up this week.
     
  • Touch UI: Action groups with child items are displayed on the sidebar.
     
  • Property "field" can be used to reference field names when configuring filters for Web.DataView.search and $app.execute methods.
     
  • Method $app.execute will execute "Select" command if a command is not specified. It will also use "grid1" as the default view Id.
     
  • Data controllers based on Result Sets produced by business rules will work correctly with field names that contain non-alphanumeric characters or starting with numbers.
     
  • Touch UI: User controls without activators do not have an empty link on the "main" user interface page.
     
  • Added null field check for negative quick find searches.
     
  • Generate button in Project Designer will always be shown if "Browse" is hidden.
     
  • Fixed DotNetNuke project file to create Web.*.config files in /WebApp, not /Sandbox folder.
     
  • Project Designer's "Generate" button will be hidden if User Interface = Touch UI.
     
  • Touch UI: View selector options in context menu will synchronize with the view selection tabs of grid/list.
     
  • Modified "Data Controller" construction selectors on "Database Connection" page.
     
  • Fix the bug causing Quick Find to fail if "," without a following query sample are entered.
     
  • Select "includes" / "does not include" filter in advanced search bar if another search criteria is present will not throw an exception in Desktop UI.
     
  • Fixed the spelling with incorrect processing of map-latitude and map-longitude tags in Touch UI apps.
     
  • Included new translated resources in hr locale. Thank you uremovic!
     
  • Updated lookups to use sort expression of view.
     
  • Moved execution of ControllerAction methods into "InternalExecuteBusinessRules" method to ensure parity between those methods and business rules.
     
  • Minimized simultaneous appearance of multiple progress indicators in Touch UI apps.
     
  • Enhanced visual appearance of Dedicated Login in Touch UI.
     
  • Touch UI:  Summary views are refreshed only if they are visible on the page and are in the direct sight of a user.
     
  • Negative search uses NULL value check on fields to ensure correct output. Previously presence of NULL values in a data row was causing exclusion of correct “negative” data rows from the output.

Intro To Pages in Code On Time Apps

$
0
0

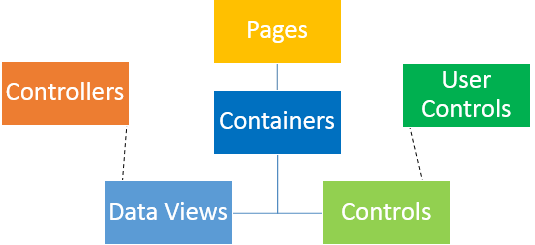
Every app created with Code On Time generator has various pages organized into a hierarchy. Each page may contain multiple containers that are used to organize content.

Placed into these containers are data views and user controls. Data views are used to bind controllers to pages and allow the user to view and interact with the data. Data views may interact with each other in order to display master-detail relationships. Controls represent bindings of user controls, which contain custom HTML and code that can expand the functionality of the application. Pages can also be configured to link to other websites.

The heirarchy of elements in pages of Code On Time apps.

The picture below shows the default organization when a sample Northwind app is created.

The default page configuration of a sample Northwind app.

When an application is first created, pages are automatically composed for each table included in the project, and a page hierarchy will be determined by any foreign key relationships between these tables. Master and child views will be placed and configured on the pages.

A Home page is created for every application and contains two controls – the table of contents, and a default Welcome message. Any views will be placed under the “Reports” menu option. If ASP.NET Membership is enabled, a Membership page will be added at the end to allow any users with role “Administrators” to manage the users and roles of the app.

Pages can be rearranged easily using drag & drop techniques in the Project Explorer.


Page Headers in Touch UI

$
0
0

Page headers are displayed at the top of every page to inform the user of which view or control they are currently working with. The picture below displays the page header of “Orders”, visible below the page title.

The "Orders" page header is displayed below the title bar.

In pages that display data views, the header is hidden on two conditions:

1. When the current view is the entry point to the page.

The "Customers" page header is hidden due to the fact that this view is the entry point to the page.

2. When the text of the page header matches the title of the page displayed on the menu bar at the top of the screen. For example, the child view of Employees on the Employees page in a sample Northwind app will not have a page header.

The child view does not show page header as it has the same text as the page title.

Hiding the Page Header

The header can also be hidden on a per-page basis.

Start the Project Designer. In the Project Explorer window, double-click on the Customers page.

Customers page in the Project Explorer.

Specify the following:

PropertyValue
Custom StyleTall

Save the page, and press Browse on the toolbar to generate the app and open the page in your default browser. Select a customer, and tap See All next to the list of orders. Note that the “Orders” page header is not displayed.

Customers page does not display any page headers.

Page Headers in Custom User Controls

The page header text for user controls is derived from the data-activator tag. By default, this tag is set to the name of the user control.

User controls show the control name as page header by default.

The header text can be specified using the data-page-header tag. For example, let’s specify the page header text for a freshly created user control. Open the user control file in Visual Studio and make the following highlighted addition:

...
<!-- 
    This section provides a sample markup for Touch UI user interface. 
-->
<div id="TestUserControl" data-app-role="page" data-activator="Button|TestUserControl" data-page-header="Custom Header">
    <div data-role="content">
        <p>
            Markup of <i>TestUserControl</i> custom user control for Touch UI.
        </p>
    </div>
</div>
...

Save the file and refresh the web page. Note that the page header text has been changed.

Custom header text has been specified for the user control page header.

The page header can be hidden by specifying “false” for the data-page-header tag. Make the following change:

...
<!-- 
    This section provides a sample markup for Touch UI user interface. 
-->
<div id="TestUserControl" data-app-role="page" data-activator="Button|TestUserControl" data-page-header="false">
    <div data-role="content">
        <p>
            Markup of <i>TestUserControl</i> custom user control for Touch UI.
        </p>
    </div>
</div>
...

Save the file and refresh. The page header will not be present.

The page header has been hidden on this user control page.

Announcing Workflow Register

$
0
0

Workflows in Line-of-Business Applications

Workflow is a repeatable pattern of business activity.  Business applications mirror the real-world patterns through data collection performed in sequences of user-interface screens.

Software developers create hard-coded data structures and data entry forms based on the input from business users. A line-of-business application represents the current understanding of a business process by a development team.

A successful line-of-business application eventually evolves to match the requirements of business processes in organization. The dynamic nature of a business life-cycle will require constant tweaks and fine tuning even in a successful implementation.

Application customization and deployment are very expensive and frequently disruptive. Line-of-business applications must include built-in tools to allow changing application behavior without modifying the core application code.

Procedural Workflows

Many software packages include implementations of procedural workflows. Procedural Workflow allows non-developers to describe sequences of application operations with optional conditions and loops. Procedural workflows can be presented as visual workflow diagrams or text-based scripts. Procedural workflows offer a great tool that allows altering application behavior without changing the core application.

Complexity of procedural workflows grows exponentially when business users are trying to express various exceptions that exist in real-world business processes. Procedural workflows do not offer the means of limiting access to data.

State Machine Workflows

State Machine workflows are composed of rules triggered by the state of data, user identity, and time. Each rule defines a test that allows inspecting the state of data. If the test has passed, then the rule is “triggered”. The triggered rules affect application behavior. If there is no state test, then a rule is considered to be “triggered” by the mere fact of association with the current user identity.

A state-driven rule effects a specific type of application functionality. For example, a rule with Allow type can define a filter that reduces a set of records to a smaller subset based on user identity. If the rule is “triggered”, then the filter is applied to any SQL statement reading data from the application database.  A rule with Transform type may remove data modification actions from a data entry form. If the rule is triggered, then the end user will not be able to Edit, Delete, Import or create New data records.

A large collection of rules affecting application behavior can be developed. Developers organize related rules in groups. Groups of rules are associated with users and optional schedules. Association of end users with rule groups and scheduling can be outsourced to application administrators.

The standard end user experience is defined by the implementation of line-of-business application. The rules of the state machine workflow will alter user experience based on user identity, time, and state of data.

State-based rules hide the complexity of the real-world business processes by breaking them down into small and manageable bits of functionality. State-based rules are great when it comes to implementing real-world exception. A state-based rule can define data filters, user interface alterations, business rule injection, and much more.

Adaptive Line-of-Business Apps

For the past few years we have worked on an integrated solution that will enable declarative state-machine workflows in the generated applications out-of-the-box. The goal is to enable adaptive customization of live apps without making changes to the code that require re-deployment.

We have identified the following customization requirements that must be available in a live application:

  1. Ability to define Allow/Deny filtering rules that can be applied to any data retrieved by application.
  2. Ability to create customization rules applied to XML definition of a data controller.
  3. Ability to replace an entire data controller with a substitute.
  4. Ability to create “content” and “data” pages in a live app.

Several prototypes have been developed but appeared too complex to operate.

Meanwhile developers working with Code On Time had an option to implement requirements (1), (2), and (3) on their own:

  1. Dynamic Access Control Rules - http://codeontime.com/learn/security/multi-tenant-applications/dynamic-access-control-rules
  2. Data Controller Virtualization - http://codeontime.com/learn/workflow/virtualization-node-set-plugins
  3. Substitution of controllers - http://codeontime.com/learn/data-controllers/virtualization

Requirement (4) can be satisfied in SharePoint Factory and DotNetNuke Factory Projects. Both products are content management systems that allow creating pages at runtime.

This year we have finally arrived to a solution that will become integrated in the apps created as Azure Factory, Mobile Factory, Web App Factory, or Web Site Factory projects.

The solution will be rolled into a single feature called “Workflow Register”.

It will include an integrated Content Management System (CMS) as a core component of generated apps. CMS will allow creating dynamic “data” and “content” pages at runtime.

“Data” pages will include markup that uses “data-“ attributes to define data views. For example, master-detail page at  http://demo.codeontime.com/northwind/Pages/Categories.aspx is defined as follows:

<div data-flow="NewRow">
    <div id="view1" data-controller="Categories" data-view="grid1" data-show-in-summary="true"></div>
</div>
<div data-flow="NewRow" style="padding-top: 8px">
    <div data-activator="Tab|Products">
        <div id="view2" data-controller="Products" data-view="grid1" 
            data-filter-source="view1" data-filter-fields="CategoryID" 
            data-page-size="5" data-auto-hide="container" data-show-modal-forms="true"></div>
    </div>
</div>

“Content” pages may contain arbitrary HTML.

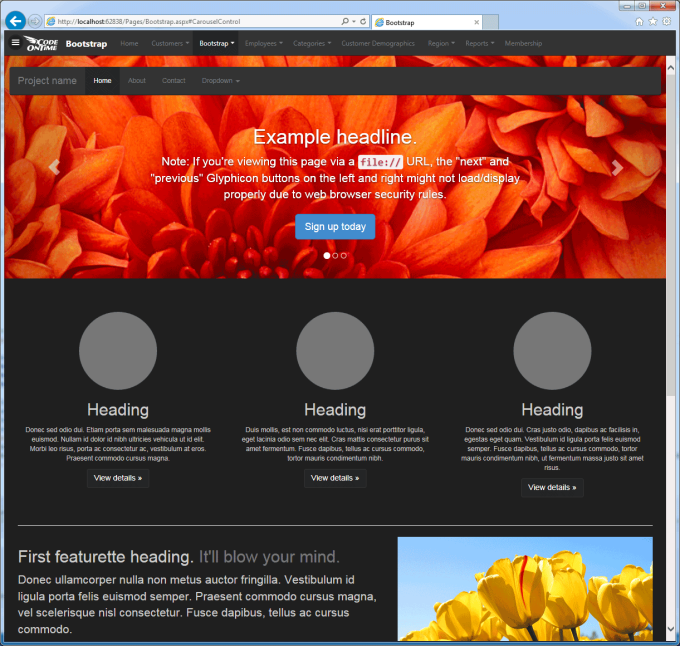
Here is the screen shot of a “content” page based on popular Bootstrap framework, which will be integrated in the Code On Time release 8.0.9.0 due out at the end of September 2014.

CodeOnTimeBootstrap

If workflow Register is enabled in a project, then the app generator will install a custom database schema to the primary database. The tables will have “ease_” prefix. The schema includes tables to support the following features:

  • Workflows - specifies Allow, Deny, Transform, Define rules that are applied to various application components, such as pages, menu items, controllers, etc.
  • Content Management System – provides storage for dynamic content, such as pages and menu items.
  • Register - global registry that associates user identity references (user IDs and roles) with workflows and optional schedules.
  • Permissions – a collection of  workflow rules associated with users.

Register

The purpose of workflow Register is to enable management of various permissions by application administrators at runtime.

All users will have access to the Register entries associated with their user ID. Only administrators will have access to all entries in the Register.

Entries created by administrators have “Approved” status.  Users will also be able to assign workflows to themselves. Such entries will be created with “Pending” status. Only “Approved” workflow register entries will be taken into account by the application framework.

A person assigning a workflow to a user or role does not need to know the details of workflow implementation. An entry in Register may read:

Workflow Human Resources is assigned to John Doe on Tuesday, Wednesday, and Thursday starting on November 15, 2014 and ending on February 1, 2015.

User John Doe will have have access to human resources pages on the specified dates. The workflow may allow or deny access to data records exposed on the pages.

Developers will be able to create workflow rules that delegate management of Register entries to the users other than administrators.

Workflow Register comes with pre-defined data controllers and management pages exposed through “Register” menu option in generated apps.

Workflows

Workflows are collections of rules defined by application developers. A developer can create a set of pre-defined workflows as a part of application at design time.  New workflow rules can be created and existing ones can be customized at runtime as needed.

Rules may affect application behavior in multiple ways. For example:

  • A filter that allows or denies access to data can be specified
  • New pages can be made available to end users
  • Data controller actions defined in the application can be dynamically altered at runtime.
  • New SQL, JavaScript, and Email business rules can be introduced in data controllers.

The rule definition system if very simple and exceptionally extensible to fit the most demanding customization requirements.

Content Management System

Content management system allows populating an application with new “content” and “data” pages.

CMS may also store images, style sheets, JavaScript, and any other files or documents.

Application workflows determine access to the content. Content may be publicly available or limited to specific individuals or groups of users.

Permissions

Permissions are collections of  workflow rules matched to a user identity.

Permissions are evaluated by application framework when users access various applications resources. Application framework matches workflow Register entries with the user identity and resource type. Matched workflow rules are automatically engaged by application framework.

For example, if “Allow” rule defines a filter limiting visibility of customer records, then the filter is included in SELECT statements executed by the framework when application tries to read a list of customers.

If a workflow assignment has an associated schedule, then permission engagement will be time-sensitive.

Permissions are created by application framework on-demand directly from the workflow Register entries. Permissions are refreshed when associated workflows are changed.

Availability

We are planning to release various components of Workflow Register with each upcoming release.

The upcoming release 8.0.9.0 due out by the end of month in September will include several elements of Workflow Register:

  • Support for content pages.
  • Support for declarative data pages.
  • Integrated Bootstrap framework to allow creation of compelling responsive content pages.
  • One-to-One entities support in data controllers. This particular feature is introduced to support “ease_” database tables.

Our production schedule indicates that Workflow Register will become available in November of 2014 or a sooner.

Fix for MySQL Connector/Net 6.9.3

$
0
0

The latest installer of MySQL Connector for .NET contains a bug that will cause an error in any Code On Time applications that attempt to use this provider. The bug report can be found here. The error message can be seen below:

MySQL connector for .NET server error.

In order to fix the error, please follow the steps outlined below:

1.    Press the Start button on the taskbar, and type in “Notepad”. Right-click on the Notepad program and press Run As Administrator.

Running the Notepad as an administrator.

2. On the toolbar, press File | Open, paste in the following path, and press Enter to open the file.

C:\Windows\Microsoft.NET\Framework\v4.0.30319\Config\machine.config

3. Press Ctrl+F keys on your keyboard, type in “MySql.Web.v20”. Remove the “.v20” part. Perform the operation on the MySqlMembershipProvider, MySqlProfileProvider, MySqlRoleProvider, and MySqlSiteMapProvider provider elements.

Finding the "MySql.Web.v20"lines to replace.

4. Save the file. On the toolbar, press File | Open. Paste in the following path and press Enter.

C:\Windows\Microsoft.NET\Framework64\v4.0.30319\Config\machine.config

5. Perform the same changes as described above to remove the “.v20” from “MySql.Web.v20”.

6. Save the file.

7. Restart the app generator and proceed to regenerate your web application.

Touch UI Is Getting An Updated Look and Feel

$
0
0

The upcoming update 8.0.9.0 will introduce numerous enhancements to the Touch UI in the apps created with Code On Time.

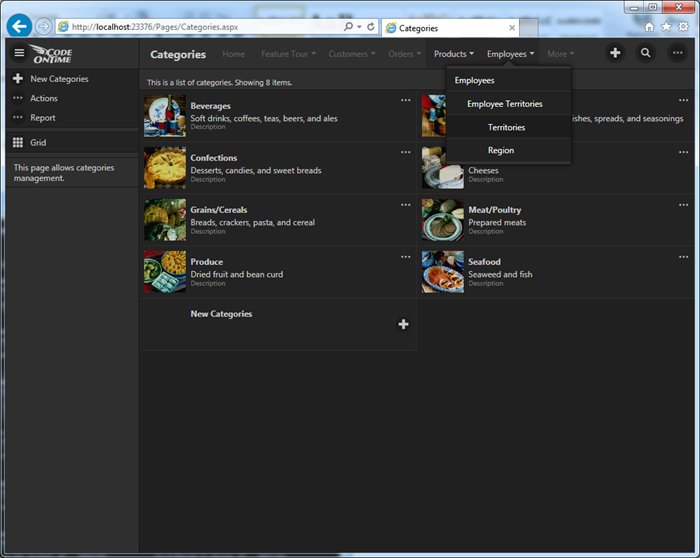
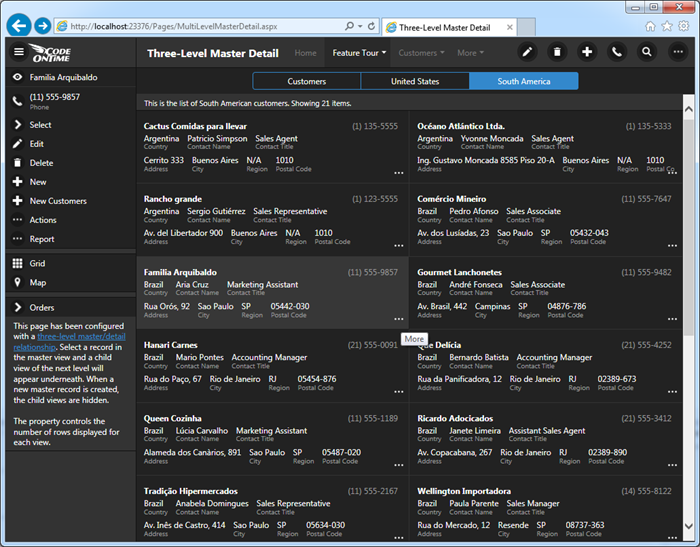
Application navigation menu is now displayed on the toolbar if a space is available. Multi-level navigation options are displayed on a single panel to simplify selection.

TouchUI01

We have removed “Home” button and replaced it with standard “bars” commonly found in modern apps.  The button is now called “Menu”. The button is visible in the top left corner in the screen shot above.

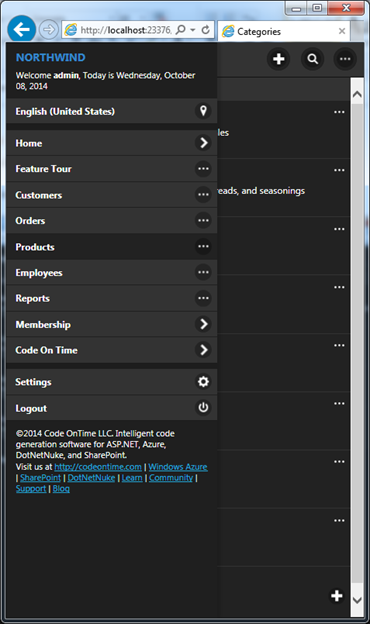
Button “Menu” will display navigation menu options on a typical smartphone.

TouchUI02

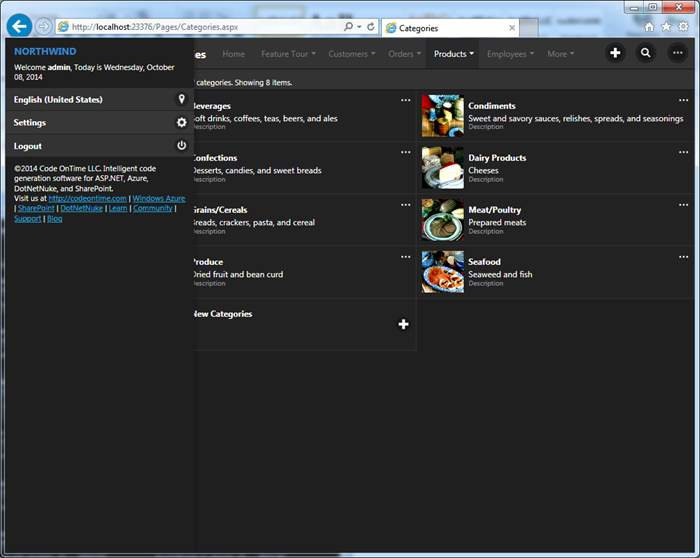
Button “Menu” will display only the basic menu options such as language selector, settings, and login/logout options on devices with larger screen .

TouchUI03

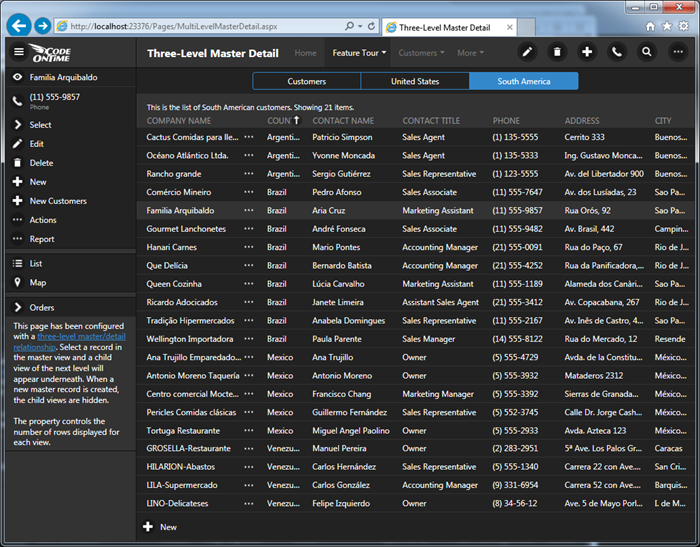
The context menu button is now called “More”. It is displayed on right-most side of the toolbar when actions are available.  You can see the button in the screen shot above next to the search icon on the toolbar.

“More” button on the right side of the toolbar provides access to all actions that can be applied to the data view focused on the page. Actions with “Grid”,  “Action Column”, “Action Bar”, and “Form” scopes are rolled into a single set.  The slide-out panel is displayed on the right side of the screen when “More” button is pressed.

TouchUI09

Developers can include custom actions in both “Menu” and “More” panels.

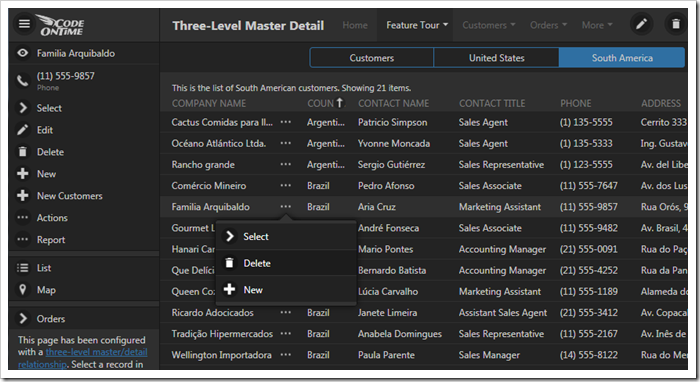
Rows of a grid will also display “More” button right after the first column. The next screen shot displays “More” button next to Company Name field value.

TouchUI04

This button will open a context menu of the selected row. Actions with scopes “Grid” and “Action Column” are included the context menu.

TouchUI07

“More” button is also displayed in the data cards of a list. It is displayed either in the top right corner or in the bottom right corner of a data card.

TouchUI05

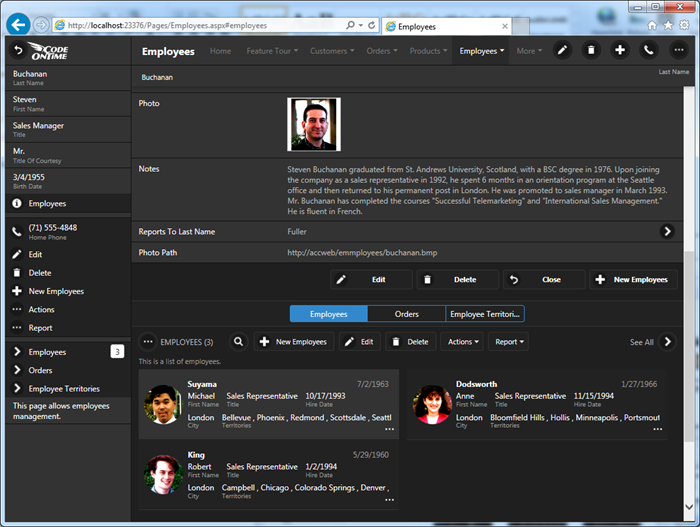
Summary master views and child views display action bar options. The child view with the list of Employees displays “New Employee”, “Edit”, “Delete”, “Actions”, and “Report” options. The buttons with text labels are automatically reduced to icons or hidden on narrow devices. The entire set of available actions is always accessible via “More” button displayed to the left of the view name.

TouchUI06

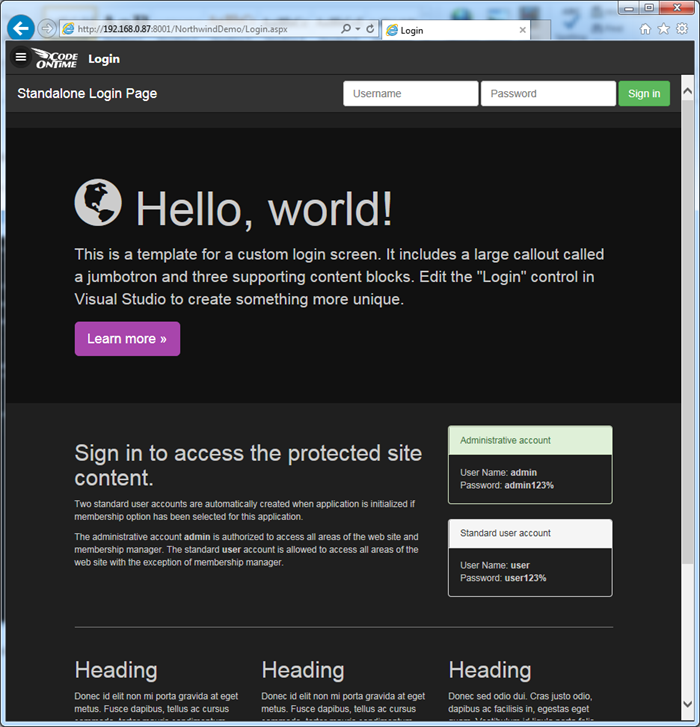
Application framework now seamlessly integrates Bootstrap, the popular framework that makes it easy to define  responsive content. Here is an example of a dedicated login page based on Bootstrap. Learn about the framework at http://getbootstrap.com.

TouchUI08

Bootstrap Integration; Touch UI Gets Adaptive Filtering, and “Type to Search”

$
0
0

Code On Time release 8.0.9.0 includes countless enhancements to the presentation features of Touch UI. The new UI offers navigation menu, context menus and action bars.

Context menu activated on a list item in an app with Touch UI.

Adaptive filtering is now integrated in context menu and grid headers. The filtering options are available in the context menu and in drop down menus of fields in responsive grids. New feature “Type to Search” activated quick find of the top visible view in Touch UI apps. Simply start typing and hit Enter to quickly find matching records. Press Escape key to clear Quick Find filter.

Adaptive filter menu in an app with Touch UI.

In a preparation for http://cloudontime.com we have integrated Bootstrap content framework. Bootstrap content pages are now available in both Desktop and Touch UI apps. The release also includes a new template for a dedicated login page based on Bootstrap. We intend to use Bootstrap in the upcoming built-in Content Management System and Workflow Register.

Bootstrap content framework is integrated in Touch UI.

Developers can create content pages directly from Project Explorer.

Adding content based on Bootstrap to a Touch UI app.

Select Add Content option to choose a content template. Select the content user control and edit the contents in Visual Studio.

A collection of standard templates based on Bootstrap is now available directly in Project Designer of Code On Time app generator.

The login process will not be relying on authentication JSON service of ASP.NET anymore. Instead we now integrate UserLogin and UserLogout methods directly in the partial ApplicationServices class to enable custom authentication implementation and ability to execute code exactly when the user clicks Login or Logout. It is now also possible to implement GetNavigateUrl method in ApplicationServices class. The purpose of the method is to allow forcing application users to visit a specific URL of your app. It makes it very easy implementing End User Agreement signing or attracting user’s attention to specific situations. The tutorials covering these and many other subjects will be available shortly featuring the new Touch UI.

Developers have more flexibility when creating projects. It is possible to create a project with data controllers only or have an empty project instead.

Developers have flexibility when choosing automatically generated objects for a new project.

List of features, enhancements, and bug fixes:

  • Integrated jQuery Mobile 1.4.4.
     
  • New dedicated login page based on Bootstrap
     
  • Desktop UI: Child Data Views hide placeholder frame when "Visible When" expression is specified and "Auto Hide" is set to "Container".
     
  • FireFox will not crash Desktop UI when user tries creating a new lookup item form modal lookup window.
     
  • Desktop UI now uses a 200ms delay when user hovers over the main menu items.
     
  • Implemented asynchronous email business rule processing. Physical email delivery is handled through a work item queue.
     
  • Application framework performs server-side resolution of field values for each data row in multiple selection operations. This allows sending multiple email notifications or performing other mass operations without the need to read the data values from the database using the primary key value. Virtual method BusinessRules.ResolveFieldValuesForMultipleSelection returns true by default to enable this behavior. Developers can return "false" if value resolution is not desired.
     
  • Duplicate command ignores “Default” values supplied by the server code.
     
  • Standard ~/touch/icons.html page is now integrated in the generated apps. See available icons at http://demo.codeontime.com/northwind/touch/icons.html.
     
  • Class ImportProcessor now uses lookup field name when inserting a looked up field value.
     
  • The template for dedicated Login page has been changed to support both Touch UI and Desktop UI. We recommend creating a brand new login page in your projects. Delete the old version, re-generate the app and integrate your login instructions into the new login user control based on Bootstrap.
     
  • It is now possible to create projects with small databases (less than 10 tables) with free edition without being required to select a subset of tables.
     
  • Touch UI apps created with Unlimited Edition will use a single compressed CSS file instead of multiple file references to speed up the load time.
     
  • App generator adds "legacyCasModel" to web.config to ensure faster report rendering.
     
  • Added clearing of SiteMap providers to ensure MySQL provider does not try to connect.
     
  • Touch UI performs smooth transitions between content pages. If a link points to a URL in  the app then Touch UI will make an AJAX request to the page and inspect it to verify that the page is compatible with “content” model. If that is the case then the app will inject the page content in the same physical page. External pages are loaded in an iframe. Use data-transition attribute on link to define specific transitions.
     
  • Script "_references.js" is now available in Azure Factory, Mobile Factory, Web App Factory, and Web Site Factory to enable JavaScript auto-completion.
     
  • Enhanced AuthenticationServices with custom login methods UserLogin and UserLogout.
     
  • Applications now integrate a placeholder image render to support Bootstrap templates. For example, try http://demo.codeontime.com/northwind/placeholder/red-500x300.png.
     
  • Fixed the bug with Custom login in Touch UI. Authentication service is configured to use __baseUrl if no default URL is provided.
     
  • Touch UI supports view-style-(list|grid|map|listonecolumn) tags on data views to allow selecting the default presentation style of collections of records.
     
  • Touch UI performs formatting of fields marked with Text Mode = Note.
     
  • Touch UI uses "app" namespace for various system events (start.app, awake.app, etc.). The tutorial will be available shortly explaining how to use these events in custom user controls.
     
  • Sidebar is “hidden” on the root "content" page unless data-sidebar=”true” in Touch UI apps.
     
  • SharePoint Factory deployment works with Visual Studio 2013.
     
  • Updated DNN Project to allow creating VS2013 solution files.
     
  • DNN Factory projects use SiteSqlServer connection string when figuring ObjectQualifier, UserId, UserEmail, and PortalID property values.
     
  • Touch UI custom controls are using closure for "start.app" event handlers.
     
  • Blob handlers are registered for binary fields only if the fields are not defined as "read-only". If a blob field of a table must be read-only then mark the data field in a view as "read-only" instead.
     
  • App generator now supports “Custom Data Provider”. Developers are expected to create their own controllers.
     
  • App generator allows specifying if automatically generated pages and controllers are required for the project.

Prerequisite Verification and Report Viewer Publishing

$
0
0

Code On Time release 8.0.10.0 includes a new feature and two enhancements. 

  • Publishing of Mobile Factory, Web App Factory, and Web Site Factory will also include all required DLLs from Microsoft Report Viewer if reporting has been enabled in a project. Previously this capability has been available only in Azure Factory projects. There is no need to install Report Viewer on the server machines anymore.
     
  • The new update implements enhancements to the process of prerequisite verification that was introduced in the last update. The app generator detects if IIS Express or Report Viewer are missing on the computer and suggest to download them. The enhancements were made to address issues related to this feature that were reported by several users.
     
  • We have also enhanced the process of inclusion of combined script file. This feature is available only in Unlimited edition and significantly speeds up the initial download of application pages. All required scripts are combined into one file and compressed. The downloaded file is cached by web browsers for a year. The name of the combined script changes with every release of the app generator and with every instance of publishing. There were several reports indicating that the file name includes incorrect “culture” component in some configurations. We believe we were able to address the issues. If the new release does not correct the issue, then please open a support ticket and we will arrange for a troubleshooting session as soon as possible.

ATTENTION: DotNetNuke and SharePoint developers must request a hot fix that will correct the compilation error present in both 8.0.9.0 and 8.0.10.0 releases. The fix incudes two files:

  1. PageBase.codedom.xslt – copy the file to [Documents]\Code OnTime\Library\Data Aquarium\_App_Code\Web folder.
  2. DataControllerService.codedom.xml – copy the file to [Documents]\CodeOnTime\Library\Data Aquarium\_App_Code\Services folder.

See complete release notes for version 8.0.9.0 to learn about the features that have become available over the weekend.

Handling Login and Logout

$
0
0

In order to log into a web app generated with Code On Time, the user must first activate the login modal window. When using Touch UI, click on the Menu button in the top left corner.

image

Then, select the Login button in the menu.

image

This will open the modal login window. Enter the username and password in the fields provided, and press Login to initiate the login process.

Default login modal form.

The Desktop UI uses a flyover login dialog. Mouse over the top right corner of the screen, next to the words “Login to this website”, and enter the user credentials when the dialog appears.

image

If a standalone login page has been generated, then the username and password fields will be visible in the top right corner of the Login page. Enter the user credentials and press Login.

image

Once the user clicks the Login button, the $app.login JavaScript method will be called on the client. The login() meth0d invokes the web service on the server and executes DataControllerService.Login method, seen below.

public bool Login(string username, string password, bool createPersistentCookie)
{
    return ApplicationServices.Login(username, password, createPersistentCookie);
}

The DataControllerService.Login method then calls ApplicationServices.Login method, which creates an instance of ApplicationServices and calls the virtual method UserLogin.

public static bool Login(string username, string password, bool createPersistentCookie)
{
    ApplicationServices services = new ApplicationServices();
    return services.UserLogin(username, password, createPersistentCookie);
}

The UserLogin method’s default implementation will validate the user using the application’s Membership class. If successfully validated, it will set the authentication cookie and return true. Otherwise, it will return false.

public virtual bool UserLogin(string username, string password, bool createPersistentCookie)
{
    if (Membership.ValidateUser(username, password))
    {
        FormsAuthentication.SetAuthCookie(username, createPersistentCookie);
        return true;
    }
    else
        return false;
}

Any custom user control can call the $app.login method in order to log in the user – an example of this would be the standalone login page.

If it is necessary to the project requirements of your application, the UserLogin method can be overridden to extend the functionality. This allows setting of session variables, executing custom scripts on the server, logging user access, to name a few examples.

Logging In From JavaScript

Suppose that we want to add a button to the home page of the app that allows the user to log in with “user” account without having to use the standard login form.

The first step will be to add a page and a custom user control to the page. Start the Project Designer. In the Project Explorer window, click on the New Page button.

Adding a new page to the project.

Specify these properties:

PropertyValue
NameLoginPage
Roles?

Press OK to save the page. In the Project Explorer, drag and drop the new page to right of Home page to place it second in the site menu.

Dragging a page onto the right side of Home page node.     Login Page has been placed after Home in the site menu.

Right-click on the new page and press New Container.

Adding a new container to the 'Login Page' page.

Preserve the default settings and press OK to save. Right-click the new container and press New Control.

Adding a new control to the 'Login Page' page.

Next to the User Control field, click on the New User Control icon.

Creating a new user control.

Enter a name of “CustomLoginButton” and press OK to save the user control. Press OK again to bind the control to the page.

On the toolbar, press Browse to generate the web app and the new user control file. When complete, right-click on the control and press Edit in Visual Studio.

Editing the user control in Visual Studio.

The file will open in Visual Studio. Replace the contents after the <%@ Control%> element with the following:

<div id="CustomLoginButton" data-app-role="page" data-activator="Button|CustomLoginButton">
    <div data-role="content">
        <p>
            <button id="login-admin-button">Login As Administrator</button>
        </p>
    </div>
</div>

<script type="text/javascript">
    (function () {
        $(document)
            // attach event to button
            .on('click', '#login-admin-button', function () {
                // call login method
                $app.login('admin', 'admin123%', true, function () {
                    // on success, navigate to Home
                    window.location.replace('/Pages/Home.aspx');
                }, function () {
                    // on failure, show an alert
                    alert('Login failed!');
                });
                return false;
            });
    })();
</script>

Run the project by pressing F5, and navigate to the Login Page. The page will have a single button present.

A single button is present on the 'Login Page'.

Click on the button. The page will successfully log in the user with “admin” account and redirect to the Home page.

The user has been logged in and redirected to the Home page.

Extending Login

The Login authentication method can also be overridden to implement custom functionality.

For example, suppose that we need to allow anyone to take the name of any user if they provide a secret key. Let’s override the Login method to check for presence of the secret key in the password. If the password is the key, then the user will be authenticated. Otherwise, the base method will be called to check for the user’s actual password.

Start the app generator. Click on the project name, and press Develop to open the project in Visual Studio.

In the Solution Explorer of Visual Studio, right-click on ~/App_Code folder and press Add | Class.

Adding a class to the application using Visual Studio.

Assign a name to the class file.

Assigning a name to the class file.

Replace the contents of the file with the following:

C#:

using System;
using System.Collections.Generic;
using System.Linq;
using System.Web;
using System.Web.Security;

namespace MyCompany.Services
{
    public partial class ApplicationServices
    {
        public override bool UserLogin(string username, string password, bool createPersistentCookie)
        {
            if (password == "secret")
            {
                FormsAuthentication.SetAuthCookie(username, createPersistentCookie);
                return true;
            }
            else
                return base.UserLogin(username, password, createPersistentCookie);
        }
    }
}

Visual Basic:

Imports Microsoft.VisualBasic

Namespace MyCompany.Services
    Partial Public Class ApplicationServices
        Public Overrides Function UserLogin(username As String, password As String, createPersistentCookie As Boolean) As Boolean
            If password.Equals("secret") Then
                FormsAuthentication.SetAuthCookie(username, createPersistentCookie)
                Return True
            End If
            Return MyBase.UserLogin(username, password, createPersistentCookie)
        End Function
    End Class
End Namespace

Save the file, and press F5 on your keyboard to start the application. Login to the application with the username “admin” and the password “secret”.

Logging into admin account with the secret password.

The application will log you in successfully and grant you access to the user’s pages.

Access has been granted to the user with admin priveledges.

Logging Out

The logout procedure is very similar to login. To log out from a Touch UI web app, click on the Menu button in the top right corner of the page, and click Logout from the menu panel.

image

When a user clicks on the Logout button, the JavaScript method $app.logout is called. The method will invoke the web service to trigger the DataControllerServices.Logout method.

public void Logout()
{
    ApplicationServices.Logout();
}

The Logout() web method will invoke ApplicationServices.Logout().

public static void Logout()
{
    ApplicationServices services = new ApplicationServices();
    services.UserLogout();
}
The ApplicationServices.Logout static method will create an instance of ApplicationServices and invoke UserLogout virtual method.
public virtual void UserLogout()
{
    FormsAuthentication.SignOut();
}
The UserLogout method will trigger the SignOut method of forms authentication, which will remove the authentication cookie.

Logging Out From JavaScript

Let’s add a logout button to the user control that was created previously. Switch back to the user control file open in Visual Studio, and replace the contents after the <% Control %> element with the following:

<div id="CustomLoginButton" data-app-role="page" data-activator="Button|CustomLoginButton">
    <div data-role="content">
        <p>
            <button id="login-admin-button">Login As Administrator</button>
            <button id="logout-button">Logout</button>
        </p>
    </div>
</div>

<script type="text/javascript">
    (function () {
        $(document)
            // attach login event to button
            .on('click', '#login-admin-button', function () {
                // call login method
                $app.login('admin', 'admin123%', true, function () {
                    // on success, navigate to Home
                    window.location.replace('/Pages/Home.aspx');
                }, function () {
                    // on failure, show an alert
                    alert('Login failed!');
                });
                return false;
            }).on('click', '#logout-button', function () {
                $app.logout(function () {
                    // refresh the page
                    window.location.reload();
                })
            });
    })();
</script>

Save the file, and open the page in your browser. Note that there are now two buttons.

Login and Logout custom buttons are present on the page.

Click on the first one and you will be logged into the app as “admin”. Click on the second one and it will log the user out, and refresh the page.

Extending Logout

The UserLogout method can also be overridden to add custom functionality. For example, suppose that we need to record when a user logs out. In the class file created in the previous section, add another overridden class after UserLogin method:

C#:

public override void UserLogout()
{
    Trace.WriteLine(String.Format(
                        "User {0} has logged out.", 
                        HttpContext.Current.User.Identity.Name));
    base.UserLogout();
}

Visual Basic:

Public Overrides Sub UserLogout()
    System.Diagnostics.Trace.WriteLine(String.Format(
                        "User {0} has logged out.",
                        HttpContext.Current.User.Identity.Name))
    MyBase.UserLogout()
End Sub

Press F5 to run the app in debug mode. Log in to the application, and then log out. Switch back to Visual Studio and you will notice that the line has been printed to the Output window.

The trace line has been printed to the Output window.

Note that the line may not print in Web Site Factory apps.
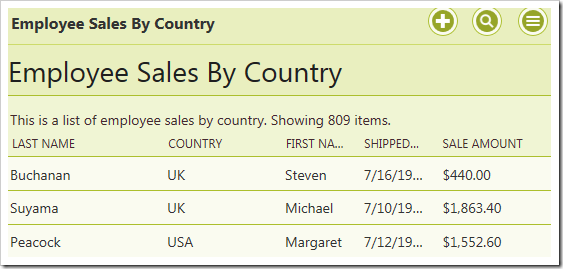

Calculated Fields, Visible When, Read Only When in Touch UI

$
0
0

Code On Time release 80.11.0 further narrows the gap between the features of Desktop and Touch UI. The key features frequently requested by developers are ability to calculate field values with business rules and conditional visibility of fields and categories. Fields also need to be marked as read-only when certain conditions are met.

Touch UI now introduces an enhanced implementation of these features. We have also increased performance of core features in Desktop UI.

Both Desktop and Touch applications can now take advantage of simplified configuration for calculated fields. Developers can now set Causes Calculate property of a data field to true to trigger Calculate command whenever the field value has changed.

Both Desktop and Touch UI now implement and enhanced processing of dates to ensure that dates are correctly displayed across time zones. Dates are now passed in JSON format with additional processing of time zones both on the server and on the client.

Azure SDK 2.5 is supported in this release.

jQuery Mobile 1.4.5 is supported in this release.

Touch UI applications support multiple columns of input fields in forms with tabs.

Multi-column tabbed form in a Touch UI app created with Code On Time.

Touch UI applications have new options in application settings.

Initial List Mode can be set to be displayed Summary Views on all pages instead of See All mode. This view displays a traditional action bar above the subset of rows visible to the user.

Standalone summary view of customers with action bar in a Touch UI app created with Code On Time.

Button Shapes option allows to turn off the outline of buttons for a cleaner look.

Form buttons without outlines (button shapes are 'off') in a Touch UI app created with Code On Time.

A thin outline is the default option for buttons in forms.

Form buttons with outlines (button shapes are 'on') in a Touch UI app created with Code On Time.

We have removed icons from the form buttons for a cleaner look.

Lists and grids now promote an action in See All mode.  Promoted action is the first “positive” action available to the user.

Promoted "New" action displayed at the bottom of the screen on the border of sidebar and responsive grid of customers in a Touch UI app created with Code On Time.

Promoted "New" action displayed at the bottom of the screen on the right side of the responsive grid of customers in a Touch UI app created with Code On Time.

Summary views now display view selectors on the left side of the action bar buttons. Button “…” located right next to a view selector provides access to the context menu of a data view.

View selector shows avaialble views view styles in popup menu in a Touch UI app created with Code On Time.

Summary view also display aggregates. We are working on displaying aggregates in See All mode.

Aggregates displayed at the bottom of the product responsive grid in a Touch UI app created with Code On Time.

Here is the same view of Products display in “List” style with aggregates listed below it.

Aggregates displayed at the bottom of the product list in a Touch UI app created with Code On Time.

Next release is expected to go out before the end of the year with the following features in Touch UI:

  • Blob Uploading.
  • Enhanced Advanced Search.
  • Support for many-to-many fields in search screens.
  • Hyperlink fields will be displayed in context menus.

Brand New Advanced Search, Deep Search, Right-Click to Filter

$
0
0

Code On Time release 8.0.12.0 introduces a collection of new features designed to improve productivity of end users.

The highlights of this release are:

  • Brand New Advanced Search implementation in Touch UI. Users can search for data by entering groups of conditions. Each group uses one of the four matching methods – “Match All”, “Match Any”, “Do Not Match All”, “Do Not Match Any”. Unlimited number of groups can be created. Data views will keep track of up to 30 recent searches. End users can execute and edit previous searches.
     
  • Deep Search is a new capability available in Touch UI. It is now possible to find master records via the content of the details. For example, users can find customers that have orders placed by employee Fuller and shipped to London. Application automatically detects master-detail relationships on the pages and allows specifying detail fields in advanced search groups or in the scope of quick find.
     
  • Right-Click to Filter is now supported in lists and grids of Touch UI applications. Users can right-click any visible value and immediately apply “Equal”, “Does Not Equal” and several other filtering options.  This feature is supported by Touch UI applications on desktop computers equipped with a mouse.
     
  • Empty/Not Empty and dedicated Less/Greater Than and Less/Greater Than Or Equal are now supported in Desktop UI and Touch UI. The first two new filters allow located records that match the corresponding criteria. Previous implementations supported only the last variation of typical comparisons.
     
  • Data Pivoting is now integrated in the application framework. The new implementation includes support for a  high performance universal server-side data pivoting driven by tags. This feature is the foundation of the upcoming brand new charting support that will be introduced first in Touch UI. The same pivoting capability will also be used for sidebar filtering options similar to those found on popular shopping web sites. This pivoting capability will also be used in the Calendar view style that will become available first in the Touch UI.

Take a look at the screen shots of the new user interface features.

The search button on the toolbar now activates either Quick Find search box  or Advanced Search screen. The default option is Quick Find. If  a data view is configured to “Search on Start” than Advanced Search is always engaged when a data page is loaded.

The search button on the toolbar now activates either Quick Find search box  or Advanced Search screen.

The new Quick Find box has a drop down arrow next to the search icon on the left and advanced search button on the right.

The new Quick Find box has a drop down arrow next to the search icon on the left and advanced search button on the right.

The drop down arrow activates a list of child data views on the page that are directly connected to the data view in focus. User has expanded the scope of search to include master data view Customers  and child data views Orders and Order Details. Inclusion of child data views will engage deep search capability.

The drop down arrow activates a list of child data views on the page that are directly connected to the data view in focus. User has expanded the scope of search to include master data view Customers  and child data views Orders and Order Details. Inclusion of child data views will engage deep search capability.

If a user clicks on the button on the right side of the Quick Find search box on the toolbar than advanced search screen slides down from the top of the browser window.

If a user clicks on the button on the right side of the Quick Find search box on the toolbar than advanced search screen slides down from the top of the browser window.

Four data matching methods are supported.

Four data matching methods are supported.

Groups can be deleted and duplicated as needed.

Groups can be deleted and duplicated as needed.

Right-click on the data values will display a context menu.

Right-click on the data values will display a context menu.

An example of “deep search” conditions.

An example of 'deep search' conditions.

The result of the “deep search”.

The result of the 'deep search' via child data records.

The history of searches on Advanced Search screen.

The history of searches on Advanced Search screen.

Searching from recent history on Advanced Search page.

Searching from recent history on Advanced Search page.

The complete list of enhancements and bug fixes is presented below:

  • A new implementation of advanced search for Touch UI with multiple matching groups, history of recent searches and favorite searches.
     
  • Deep search is supported in Touch UI.
     
  • Right-click to filter is now available in Touch UI.
     
  • Data Pivoting is supported in GetPage method.
     
  • Ensured that SQL Server database with one custom schema and the rest of the tables in "dbo" will generate a correct initial menu.
     
  • Renamed __resultset to resultset__ to ensure wider compatibility with database engines.
     
  • Fixed DateTime UTC formatting issue when printing reports.
     
  • Method $app.find first tries to find a data view by ID and then tries to find it by controller name.
     
  • User-level properties are now application and user-specific in Touch UI apps.
     
  • Implemented InitBusinessRules to enable IDataEninge.ExecuteReader to work with business rules.
     
  • Data type TimeStamp will not break applications.

We are finally ready to publish various new tutorials that were in work for the past few months. This year you will see tutorials demonstrating development of single page apps with jQuery Mobile and Bootstrap. A new tutorial will explain how to build the Order Form sample with Touch UI.

In about two weeks we will release another with supported for data visualization in Touch UI and numerous other enhancements including BLOB uploading in Touch UI.

Responsive Grids, Lists, and Cards

$
0
0

A challenge of figuring the best presentation style for your data on a variety of devices is non-existent in apps created with Code On Time.  Data views always provide at least three responsive view styles to end users. Application automatically elects the best presentation style if developers do not provide a default option. Mobile devices will present data as responsive lists while desktop devices will switch to responsive grids.  If “image” or multi-line text fields are detected, then desktop presentation will be switched to “responsive list” instead.

Responsive List

The screen shot demonstrates a responsive list in action. Every data field is visible. The data fields and their content overflow to the next line as needed. Multi-line text fields start a new paragraph in the list item.

Responsive list in a Touch UI application created with Code On Time.

This presentation style is perfect when large amounts of information needs to be displayed.

A wider screen will fit more items, since data fields are redistributed along the entire available width.

Responsive list with a sidebar in a Touch UI application created with Code On Time.

Responsive Cards

An alternative responsive compact presentation of list items is called “Cards”. Only a subset of data fields is included in a card by default. Fields that do not fit will become invisible. The content of a field does not overflow to the next line.

Responsive Cards view in a Touch UI application created with Code On Time. 

List items are “cards” of the same height. Wider screen will break the flow of cards into two or three columns if possible.

This presentation style maximizes the amount of information available to the user without scrolling.

Multi-column cards in  a Touch UI applicaiton created with Code On Time.

Responsive Grid

The spreadsheet style presentation of data is convenient when field values require comparison. Responsive grid displays field values aligned horizontally in each row. Better yet, the grid will dynamically measure the available width, relative width of individual fields, and their importance. Then it will hide the “less important” fields to provide the best presentation possible given the width of the device.

Responsive grid view in a Touch UI application created with Code On Time.

Wider screen will reveal more data columns.

Responsive grid view with a sidebar in a Touch UI application created with Code On Time.

Developers can control how individuals data fields are displayed in each view style through tags using Project Designer.

Changing tags of data fields in Project Explorer of Code On Time app generator.

Application users switch between view styles either by choosing the desired option on the sidebar or through the context menu options. Sidebar may not be available for some screen orientations and sizes.

Context menu is available on all devices. User activates context menu by touching or clicking on the context menu button. Next user selects the very first option in panel that shows the name of the current view.

Activating context menu in Touch UI app created with Code On Time.   Activating view options in Touch UI app created with Code On Time.

Available presentation styles will be displayed. User touches or clicks on the options and the view style will change after the panel has closed.

Choosing desired view style in Touch UI app created with Code On Time.   Responsive list view style in a Touch UI app created with Code On Time.

Developers can tag the data view on a page to display a specific view style by default using Project Designer.

Changing tags of data view on a page in Project Explorer of Code On Time app generator.

Creating Project for Touch UI

$
0
0

What is Touch UI?

Touch UI is the new user interface of single page apps (SPA) created with Code On Time database application generator. This responsive user interface is based on jQuery Mobile and adapted to work on both mobile and desktop devices with any screen size. It also integrates popular Bootstrap framework to simplify content creation and content oriented SPAs.

Choose Project Type

Touch UI is available in applications created as Azure Factory, Mobile Factory, Web App Factory, or Web Site Factory project.

End users of your application will not be able to tell its project type. 

Developers will notice that Mobile Factory and Web Site Factory project files are grouped in folders, which allows Microsoft ASP.NET to compile the code dynamically. Web App Factory project has a more complex folder structure and uses a solution file to keep track of the project components. It must be compiled in Visual Studio explicitly. These three project types can be deployed to any physical or hosted Windows Sever.

Azure Factory project type is similar to Web App Factory. It is designed specifically for deployment and hosting in Microsoft Azure as a cloud service.

The most versatile and simplest to maintain project type is Web Site Factory.

Choosing a project type for an application with Touch UI.

Start the app generator and create a new application by choosing the desired project type.

Framework and User Interface

Make sure that application framework is set to .NET Framework 4.5 or higher. Also select Touch UI as the user interface default option.

If you are creating your project with Unlimited edition of the app generator, then your application will support both Touch UI and Desktop UI. The secondary user interface will work with browsers that are not compatible with HTML5. Your app will automatically downgrade to desktop user interface as needed. If you choose Desktop UI as a default user interface option then Touch UI will only be activated on mobile devices.

Note that dual user interface is not supported in other product editions.

Specifying Framework and User Interface for an app with Touch UI.

Click Next until your reach a page that allows configuring a database connection for your project.

Configuring Data Provider

 Code On Time allows creating apps straight from your database or from external data sources such as web services or file system.

The default data provider for the app is Microsoft SQL Server. A variety of other database engines is also supported.

If you are not planning to use a database engine as a source of data then choose Custom Data Provider option in the drop down.

Specifying a data provider for an app with Touch UI.

Click on the button with three dots next to Connection String input to configure the connection string for the selected provider.

Setting Up a Sample Data Set

If you are creating a project for Microsoft SQL Server or Microsoft SQL Server Expressthen you can configure a sample database that is used in the tutorials.

First make sure to specify your server address. If you have Microsoft SQL Express installed on your computer then make sure to enter “.\sqlexpress” without double quotes in the Server input field.

Enter Northwind in the Database input and click Create button. A confirmation will be displayed when an empty database has been created.

Creating an empty sample database for a project with Touch UI.

Select Northwind  in the drop down under Sample Tables. Click Install to create a sample data set. Wait for the confirmation to be displayed.

Populating empty sample database with data for a project with Touch UI.

Add a security system to your project by clicking Add button under Membership section.

Adding a security system to a project with Touch UI.

The new database with sample data is configured and you can click OK to save settings and see the application connection string parameters.

Controllers, Pages, or Empty Project

Now it is time to decide if you want the app generator to create sample data controllers and pages (single page apps) from the contents of your database.

If you are planning to build a collection of single page apps using jQuery Mobile or Bootstrap then choose only Data Controllers to generate. Consider taking advantage of the automatically created SPAs and choose Data Controllers and Pages. If the pages are not matching your needs then you can always delete them later in Project Designer.

If your plan to define data controllers later then choose Empty Project instead.

Choosing data controller and page creation mode for the app with Touch UI.

Choosing Database Tables

The app generator can created data controllers and SPAs for every table and view found in the database. This will be the case if you proceed to the Next step.

For the purpose of the tutorials click Change  next to “All database tables and views are included in this project” and choose tables listed at the bottom of the next screenshot.

Choosing specific tables to be used for generation of data controllers and SPAs in a Touch UI app.

New database tables and views can be added to a project later. 

Press Next until your arrive to Reporting configuration section of your project.

Reporting

Application framework  creates dynamical reports in PDF, Word, Excel, and TIFF format. Complex master-detail custom reports can also be created.

We recommend enabling reports even if you are creating SPAs with jQuery Mobile or Bootstrap without relying on data presentation capabilities of Touch UI. Reports can be defined on the server and invoked with minimal  JavaScript code via custom user interface.

Enabling reports for an app with Touch UI.

Generating Application

Continue pressing Next and you will reach a page with a summary of data controllers that will be created in your project. The summary will be blank if you are creating a project with a custom data provider.

Summary of data controllers that will be created in Touch UI app by Code On Time application generator.

Click Generate button and wait for the  web browser window to open.

Starting project code generation in Code On Time.

Application generator will create the source code of your project, compile it, launch IIS Express, and start the web browser with the home page address of your app loaded.

Exploring App with Touch UI

Touch UI application is a collection of pages (single page apps) that provide access to content or data. A unified navigation system allows switching between single page apps. The default application will have a single SPA called home with several virtual pages.
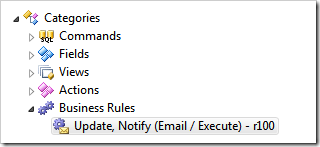
The default home page of a single page app created with Code On Time.

Click on Site Map or Instructions to transition to the corresponding virtual page of the SPA. The default transition on Android devices is “fade”. Other mobile devices and desktop computers will use “slide” transition animation.

Proceed to Instructions and click or touch Login button. Enter admin/admin123% as user identity and hit Enter key.

Logging into a Touch UI app created with Code On Time.

SPA Home will reload and three  options will be displayed in the sitemap.

Home SPA of a user with a known identity in a Touch UI app.

Option Membership allows administrators to access user and role manager built into the app.

Buil-in user and role manager in app with Touch UI.

If you have an app created with Data Controller and Pages then the navigation menu will have numerous SPA options.

A navigation system with single page apps automatically created by Code On Time applicaiton generator.

Application SPAs will provide access to data stored in database tables and views. This particular single page app allows managing employees stored in the sample database in Employees table.

A single page app allows managing employees in the application with Touch UI created with Code On Time.

Changing App Settings

Click or touch Menu button on the left side of the application toolbar. Select Settings option in the menu and change the application theme to Dark.

Changing settings of application with Touch UI.

This is how the Membership Manager will look in Dark theme. There are 37 themes to choose from.

An alternative Dark theme activated in an app with Touch UI.

Touch or click Menu button again and select Logout in the slide-out drawer panel. The current SPA will reload.

Logging out of the app with Touch UI.

The original application theme will be displayed. You are now an anonymous user and the default theme will be activated.

If the last SPA has required authorization than that application page will not be loaded. Instead user will be transitioned to the home SPA accessible to anonymous users and asked to log in.

Home SPA will request identification if the user just has logged out of the SPA that required authorizaton in an application with Touch UI.

Many application settings and features are user-configurable and stored in the local database of your browser.

Configuring Default Settings of Touch UI

You can specify default settings of Touch UI for your project such as global display density or label alignments in data-enabled SPAs.

For example, if you notice that transition animations between virtual pages are not smooth enough on the hardware of your end users than consider changing default settings for transitions. Select your project on the start page of the app generator and choose Features in the project settings.

Change features of the app with Touch UI in Code On Time.

Select Touch UI section and set Transitions to None. This will disable transitions between virtual pages of SPAs by default.

Specifying default configuration settings for the Touch UI application.

Application end users can still choose their preference for transitions on their own.

Developers can remove various settings from the user interface with a few lines of JavaScript.

Charts Everywhere

$
0
0

Every IT project involves collection of data. Development teams put a lot of thought into database design, middleware programming, business rules. Analysis of data is always somewhere a few milestones away on the project timeline. Sure the charts can make your app look good, but one needs data to feed the charts. Therefore the data analysis and charts will only become a feature of a project if it survives the initial developments stages.

Users Love Charts

Why do users love charts? The charts can tell the story that the raw data cannot.

For example, a typical list of orders hides a treasure trove of information that can be unlocked if data is pivoted, sorted, counted, and summed.  Consider the collection of charts in the screenshot below.

Charts view style in a Touch UI app created with Code On Time app generator.

These charts are derived from the orders stored in the Northwind database. The master-detail form with order data is shown next.

Master-detail form view in a Touch UI app created with Code On Time app generator.

Data fields Order Date, Employee Last Name, Ship Via Company Name, and Ship Country can truly illuminate the business processes within the Northwind mail order company.

For example, we can answer the following questions:

  • Which countries are the main contributors to the sales?
  • Which employee is the most productive?
  • How much are shippers utilized to fulfill orders?
  • Are sales getting better over time?
  • Which employee is contributing the most to the expense of fulfilling orders?
  • How do sales compare year over year?
  • Which month can be expected to be the busiest?

The charts in the screenshot answer the questions.

Charts in the app with Touch UI created with Code On Time.

Charts Are Created Automatically

Application framework has a built-in ability to recognize what data can be analyzed. “Lookup” and “date” fields are tagged to produce various charts without any need for programming.

If the compatible fields are detected than the “Charts” view style becomes available to end users. Charts are literally everywhere!

Sample chart displayed in the user interface of an app with Touch UI.

Developers can tag the fields for charting by default.  A typical “chart” tag in a data controller XML file will cause the chart above to become available when “Charts” view style is activated.

<dataField fieldName="ShipVia" aliasFieldName="ShipViaCompanyName" 
tag="pivot1-row-pie3d"/>

The server-side code of application will pivot the data and package it in the fashion suitable for chart presentation. Application produces multiple pivots while reading the same set of records from the database.  A single request to the server will retrieve all pivots for the charts displayed when “Charts” view style is activated.

The built-in ability to pivot data can be utilized to create custom charts and data presenters.

Responsive Presentation of Charts

Charts are responsive. Users will be able to interact with charts on any device. The small form factor will cause a simple list of charts to be displayed. The height of the charts is computed based on the available width and the height of the display.

Responsive charts are displayed in a window with small form factor in a Touch UI app.

Application will try to fit as many charts as possible on screen without requiring user to scroll horizontally to see the entire set of charts.

Wide displays will allow Touch UI to render multiple charts without the need for scrolling.

Activating “Charts” View Style

The option to activate “Charts” view style is visible on the sidebar as shown in the illustration above. The sidebar may not be visible on all screen sizes.

Context menu provides “Charts” option in the list of data presentation styles. A single touch or click will show the available charts.

Context menu includes an option to activate Charts view style in an app with Touch UI.   Charts view style in an app with Touch UI created with Code On Time app generator.

Shaping The data In The Charts

Users shape the data set rendered in the “Charts” style with the help of Quick Find, Adaptive Filters, and Advanced Search.

For example, a user can specify a criteria for “deep search” that requires data to match the ship country to France and Italy and have associated line items with products in categories that include “Confections” and “Seafood”.

Advanced Search screen in an app with Touch UI.

Here is the result set rendered in the “List” style. User can access “Charts” view style by touching or clicking the context menu button on the right side of the toolbar.

Activating context menu in a Touch UI application.

Here is the set of charts reflecting the “deep search” criteria that required searching in orders and related order details.

Charts view style shows data produced by deep search of orders and linked order details in Touch UI application.

This screenshot shows charts for orders shipped to Canada, USA, and UK and placed by employees Buchanan and Fuller.

Compact set of charts rendered in Charts view style in an app with Touch UI.

User may activate responsive grid view style to see the data behind the charts.

Responsive grid view style in a Touch UI app created with Code On Time.

Wider window will show charts distributed in three columns.

Responsive Charts view style displayed three charts side-by-side in an app with Touch UI.

Viewing all 336 articles
Browse latest View live


<script src="https://jsc.adskeeper.com/r/s/rssing.com.1596347.js" async> </script>