Quantcast
Channel: Code On Time
Viewing all 336 articles
Browse latest View live

Import Processor Error Handling

$
0
0

Code On Time web apps come with a native CSV Import processor that will parse comma separated files and create new records. However, this native processor does not display any errors that may have occurred due to malformed CSV. Let’s override methods in the processor in order to handle and report these errors.

Start the app generator. Click on the project name, and press Develop to open the project in Visual Studio. In the Solution Explorer, right-click on ~/App_Code folder and press Add | Class.

Adding a class to App_Code folder.

Assign a name to the item and press OK to save. Replace the code base with the following:

C#:

using System;
using System.Collections.Generic;
using System.IO;
using MyCompany.Data;
using System.Net.Mail;

namespace MyCompany.Data
{
    public partial class CsvImportProcessor
    {
        protected override bool HandleError(ActionResult r, ActionArgs args)
        {

            string dir = AppDomain.CurrentDomain.BaseDirectory;
            using (StreamWriter file = new StreamWriter(dir + "\\ImportErrorLog.txt", true))
            {
                foreach (string s in r.Errors)
                    file.WriteLine(String.Format("{0:s}: {1}",DateTime.Now, s));
            }
            return true;
        }

        protected override void ReportErrors(string controller, string recipients, string logFileName)
        {
            string[] recipientsList = recipients.Split(',');
            SmtpClient client = new SmtpClient();
            foreach (string s in recipientsList)
            {
                string address = s.Trim();
                if (!(String.IsNullOrEmpty(address)))
                {
                    MailMessage message = new MailMessage();
                    try
                    {
                        message.To.Add(new MailAddress(address));
                        message.Subject = String.Format("Import of {0} has been completed", controller);
                        message.Body = File.ReadAllText(logFileName);
                        client.Send(message);
                    }
                    catch (Exception)
                    {
                    }
                }
            }
        }
    }
}

Visual Basic:

Imports Microsoft.VisualBasic
Imports System.IO
Imports MyCompany.Data
Imports System.Net.Mail

Namespace MyCompany.Data
    Partial Public Class CsvImportProcessor
        Protected Overrides Function HandleError(r As ActionResult, args As ActionArgs) As Boolean
            Dim dir As String = AppDomain.CurrentDomain.BaseDirectory
            Using file As StreamWriter = New StreamWriter(dir + "\\ImportErrorLog.txt", True)
                For Each s As String In r.Errors
                    file.WriteLine(String.Format("{0:s}: {1}", DateTime.Now, s))
                Next
                Return True
            End Using
        End Function

        Protected Overrides Sub ReportErrors(controller As String, recipients As String, logFileName As String)
            Dim recipientsList() As String = recipients.Split(Global.Microsoft.VisualBasic.ChrW(44))
            Dim client As SmtpClient = New SmtpClient()
            For Each s As String In recipientsList
                Dim address As String = s.Trim()
                If Not (String.IsNullOrEmpty(address)) Then
                    Dim message As MailMessage = New MailMessage()
                    Try
                        message.To.Add(New MailAddress(address))
                        message.Subject = String.Format("Import of {0} has been completed", controller)
                        message.Body = File.ReadAllText(logFileName)
                        client.Send(message)
                    Catch __exception As Exception
                    End Try
                End If
            Next
        End Sub
    End Class
End Namespace

The first method above will create a file “ImportErrorLog.txt” in the application folder and write every error that occurred. It returns true in order to cancel the default handling. The second method overrides the default error reporting and sends an email to the specified recipient. This requires web app SMTP configuration. If a malformed CSV file was imported, the ImportErrorLog.txt file will look like the picture below.

Log text file logging all errors when importing.


“Data-” Attributes, Chart, and Import Processor Enhancements

$
0
0

Code On Time release 7.0.10.0 includes the following features and enhancements:

  • Legacy attributes with the namespace "factory:*" previously used in the page markup were replaced with "data-" attributes to ensure compatibility with the upcoming Mobile Client Library, Cloud On Time, and SaaS Integration feature in Unlimited edition.
     
  • Chart views will retain the height after the first rendering.
     
  • Chart views will render with the correct width and height in FireFox.
     
  • Import processor allows overriding error reporting and handling.
     
  • Fixed the issue with the Login page title not being assigned correctly.
     
  • Fixed closed "placeholder" spans in Main.master.
     
  • Fixed the bug in lookups with the style “Auto Complete” that was freezing actions in data views.

Mobile Client Library and 2nd Generation Datasheet View are planned for the next release.

Mobile feature will be based on the latest jQuery Mobile 1.3.

Next release is also expected to include SaaS Integration  feature to enable integration of Web Site Factory, Web App Factory, and Azure Factory apps with any hosting platforms without the need to create native apps. This will dramatically increase ability to create a “cloud” solution from any existing web app created with Code On Time.

How to Configure DotNetNuke Factory Project with DNN7

$
0
0

You can integrate line-of-business web applications with the popular web content management system DotNetNuke, the leading web content system for ASP.NET by using Code On Time’s DotNetNuke Factory.

Why DotNetNuke?

If you have experience with creating database web applications, then you’ve probably considered using a dynamic portal to increase the flexibility of your web application.

One can easily picture a whole world built around a few business data enabled pages. Users register using a portal,  with the latest release notes and instructions posted for their convenience. Add a quick online survey and a few blog posts to your web application, without a fuss.

If you try building such a portal on your own, you will soon find that the task is not that simple.  While you may be the leading expert in web application design with a database to prove it, web content delivery is another topic altogether.

Content management systems such as DotNetNuke and Microsoft SharePoint are widely adopted by organizations and businesses of all sizes as repositories of knowledge and web assets.

DotNetNuke is a proven portal software built with ASP.NET, boasting countless installations and a large dedicated user base. The easily available Community Edition of this product makes it especially attractive for developers who need portal-style functionality in their application at a low cost.

Integrating DotNetNuke With Your Line-of-Business Application

DotNetNuke is exceptionally easy to install and maintain – done entirely in a web browser.

DotNetNuke has impressive extensibility. One popular method of extending DotNetNuke is module development. A “module” represents an area on a portal page that is rendered by a custom application. For example, a calendar of events or a survey can be implemented as a module and placed on any portal page.j

You can also create a database application with complex data management  features and have it incorporated in a DotNetNuke module.

The development process is somewhat complicated. Here is where Code On Time’s DotNetNukeFactory comes to the rescue. DotNetNuke Factory will aid you in building a dedicated application packaged as a DotNetNuke module. This module can be deployed to the portal in seconds.

WebMatrix and DotNetNuke

Many popular software titles, including DotNetNuke, were developed for Microsoft ASP.NET Web Platform. Microsoft has created WebMatrix, a vehicle to allow simple download and installation of many popular open source web applications. WebMatrix includes a lightweight version of Microsoft Internet Information Services called IIS Express. This web server makes it possible to run web applications on virtually any type of operating system from Microsoft.

You will have to download WebMatrix at http://webmatrix.com to proceed with this tutorial.

Configuring Database

Start SQL Server Management Studio. In the Solution Explorer, right-click on Databases node and press New Database.

Creating a new database.

Assign a name and press OK to save the database.

Configuring DotNetNuke Web Site

Start Microsoft WebMatrix. Select New | App Gallery.

Creating a new app from the App Gallery.

Select .DotNetNuke Community Edition, assign a name, and press Next.

Creating a new DotNetNuke web app.

Accept the EULA, and wait for the download to finish.

Installing DotNetNuke Community Edition.

Press OK, and the web site install wizard will launch in the default browser.

Assign a password to the host account. Under Database Information, select Custom. Enter the connection string properties for the previously created database. Make sure to specify an Object Qualifier of “DNN_”.

Specifying database information for the DotNetNuke instance.

When database installation is complete, press Visit Website to see the result in action.

Creating a DotNetNuke Factory Project

Start the web app generator, and click Create new web application. Select DotNetNuke Factory.

Creating a new DotNetNuke Factory project.

Enter a name for the project, select your preferred language, and press Create.

Specifying a name and language for the new web app.

On the next page, specify the path to the DotNetNuke installation folder, and press Next.

Specifying the DotNetNuke location.

Click on the “” button next to Connection String field. In the Sample Tables dropdown, select “Northwind” and press Install.

Installing Northwind sample database in the DotNetNuke database.

When complete, click OK. Press Next until you reach the Reporting page. Enable reporting by activating the checkbox.

Enabling reports in the web app.

Hold down Shift key, and press Next to skip to the Summary page. Press Generate, and wait for the web app to open in the test site.

Installing the Module in DNN7

Switch back to the app generator. Click on the project name, and press Publish. The generator will automatically copy files into the DNN instance specified when the project was created.

Switch back to the running DNN site. Mouse over the Host tab at the top of the page and click on Extensions.

Accessing Extensions page for DotNetNuke 7.

On the Extensions page, switch to Available Extensions tab. Scroll down to Modules section, and press Install next to the DotNetNuke Factory application module.

Installing the new DNN Factory module.

Press Next twice, accept the license, and press Next again to install the module.

Accepting the license for the module.

When installation is complete, press Return to reload the web app.

The module has been installed successfully.

Creating a Page and Adding the Module

At the top of the page, mouse over Pages and press Add New Page.

Adding a new page in DNN7.

Assign the following values:

PropertyValue
Page NameCustomers
Page TitleCustomers
Insert PageAfter: Home

Switch to the Permissions tab, and check the box under View Page next to All Users. Press Add Page.

Allowing all users viewing rights to the page.

The browser will navigate to the new page. Mouse over Edit Page, and press Edit this Page.

Entering Edit Mode for the page.

Mouse over Modules, and press Add New Module. Drop the module named after your namespace into the contentPane area.

Dropping the module into the contentPane.

The module will be instantiated. Next, the logical application page must be selected. Mouse over the gear icon in the top right corner of the module and press Settings.

Accessing settings for the module.

Select Customers, and press Update.

Specifying a logical application page for the module.

Customers will now be displayed in the module on the page.

Northwind module is successfully displayed in DNN7.

How to Configure Azure Factory Project

$
0
0

With the release of Windows Azure, Microsoft has provided a great cloud database, storage, and computing service platform. Windows Azure offers many benefits, such as guaranteed 99.95% uptime, automatic OS and service  patching, integrated network load balancing, and easy scaling.

While the Windows Azure cloud may offer the perfect platform to deploy your next web application, you still need to build this application. This is where Code On Time’s Azure Factory comes in. All you have to do is paste in your SQL Azure database connection string, and hit Generate. In a minute, your advanced web application will start in your default browser, complete with sorting, adaptive filtering, reporting, charts, and much more. Hit Publish, and the application will be packaged. Upload the published deployment package to Windows Azure, and within minutes you’ll have your app running in the cloud.

Need to add more features and customize your app? Just make your changes in the easy to use Project Designer. While no coding is needed to make a great app, you can always open the source code in Visual Studio and change it to precisely fit your requirements.

The following article will explain how to generate and deploy an Azure Factory application. View our learning system if you need help setting up a Windows Azure account or creating a database using SQL Azure tools.

In order for the application created in this article to work properly, make sure to install Microsoft Azure SDK.

Creating the Azure Factory Project

Start the app generator, and click on Create a new web application. Select Azure Factory.

Creating a new Azure Factory project.

Enter a name, select your preferred language, and press Create.

Entering a name and specifying a language for the project.

Press Next to navigate to the Database Connection page. Click on the “…” button.

Enter your server username and password. If you already have an SQL Azure database, then enter the name in the Database field. If you don’t have a database, you can quickly create one using the web application generator. The next few steps explain how to create a sample Northwind database, include ASP.NET Membership and Roles, and add Session State management.

In the Database textbox, enter “Northwind”. Press Create to create the database.

Creating the 'Northwind' database.

In the Sample Tables dropdown, select Northwind and press Install.

Installing the Northwind database.

Under Membership section, press Add button. ASP.NET Membership will be installed in the database.

Adding ASP.NET Membership and Roles provider into the database.

By default, Azure Factory applications are configured to use two extra-small server instances in the cloud. If you use multiple instances, then Session State management must be included in the application. Under Session State, press Add. Press OK to confirm the installation.

Adding Session State management into the database.

Press OK to save the connection string. Press Next twice to get to the Reporting page.

Enabling reporting in the web app.

Check the box to enable reporting, and keep pressing Next to reach the Theme page. Select “Azure” theme.

Selecting the 'Azure' theme.

Hold down Shift key, and press Next. This shortcut will take you to the Summary page. Press the Generate button.

Wait until the generator finishes, and your default browser will open with your new web application. While the application is running on your computer, the database is located in the cloud. You can log in and start using the app immediately.

Deploying the Web App

It’s time to deploy the app to Azure. Go back to the generator, and click on the project name. Press Publish.

Publishing the web app from Code On Time generator.

When the process is complete, the publish folder will be opened and will contain two files, CloudApp.cspkg and ServiceConfiguration.cscfg.

Navigate to the Azure Portal. In the bottom left corner, press New. Select Compute | Cloud Service | Custom Create.

Creating a new cloud service in the Azure portal.

Specify a URL, check the box next to “Deploy a cloud service package”, and click on the right arrow.

Specifying a URL for the new cloud service.

Next, specify a deployment name and select the two file locations. Mark the Environment as “Staging”. Click on the check icon to start deployment.

Specifying parameters for publishing the new cloud service.

Press OK, and Windows Azure will start the deployment process. This step may take up to 15 minutes. Once the status of the deployment changes to Ready, use the SITE URL link found under DASHBOARD tab to view the app running in the cloud.

If you look at the URL, you will notice that it uses the ID of the deployment, not the requested DNS Name. This is because the deployment is a staging deployment. You can go back to the management portal, and choose Swap to change it into a production deployment. Now you can use the DNS Name you specified during creation of the hosted service.

When you are ready to deploy a new project revision, create a new staging deployment. Test the new deployment in the cloud. If everything is working as expected, then swap the virtual IP address of the staging deployment with the production one. Click Swap button at the bottom of the screen to do so.

SWAP button at the bottom of the screen will swap the staging and production environments.

When VIP swapping has finished, the previous application revision will become a staging deployment. Shut it down if you don’t need it. Continue upgrading staging deployment with the new revisions of the application, and swapping them later with production.

Validation with Code Business Rules

$
0
0

Data integrity is a primary concern of any database application. Data constraints must exist on the database and application server level, while client-side validation will make a web app more responsive and user-friendly.

For example, consider the following screenshot of the New Order Details form. End users can select any product and enter any price, quantity, and discount. The database engine will validate the constraints of the table Order Details and raise an exception when invalid data is submitted.

The database will prevent saving of the record if the table constraints are violated.

Let’s implement a code business rule that will perform more complex validation for Order Details controller.

Configuring Fields

Start the Project Designer. In the Project Explorer, switch to the Controllers tab and double-click on OrderDetails / Fields / ProductID* (Int32) –> Products node.

ProductID field of OrderDetails controller.

Change the following:

PropertyValue
CopyUnitPrice=UnitPrice

Press OK to save. Next, double-click on UnitPrice* (Decimal) field node.

UnitPrice field of OrderDetails controller.

Make the following changes:

PropertyValue
The value of this field is calculated by a business rule expression.true
Context FieldsProductID, UnitPrice, Quantity, Discount

Press OK to save.

Configuring Business Rule

Right-click on OrderDetails / Business Rules node, and press New Business Rule.

Creating a new business rule for OrderDetails controller.

Assign the following values:

PropertyValue
TypeC# / Visual Basic
Command NameCalculate|Insert|Update
PhaseExecute

Press OK to save. On the toolbar, press Browse to generate the business rule file.

When complete, right-click on OrderDetails / Business Rules / Calculate|Insert|Update (Code / Execute) – r100 node, and press Edit Rule in Visual Studio.

Editing the rule in Visual Studio.

Replace the code base with the following:

C#:

using System;
using System.Data;
using MyCompany.Data;

namespace MyCompany.Rules
{
    public partial class OrderDetailsBusinessRules : MyCompany.Data.BusinessRules
    {
        [Rule("r100")]
        public void r100Implementation(int? orderID,
            string orderCustomerID,
            string orderCustomerCompanyName,
            string orderEmployeeLastName,
            string orderShipViaCompanyName,
            FieldValue productID,
            string productProductName,
            string productCategoryCategoryName,
            string productSupplierCompanyName,
            FieldValue unitPrice,
            short? quantity,
            float? discount)
        {
            // 1. If the collected values are not valid then do not enforce the rule.
            //    The client library will instruct the user to correct the input.
            bool success = this.ValidateInput();
            string commandName = this.Arguments.CommandName;
            string triggerFieldName = this.Arguments.Trigger;

            // 2. Reset the base price for calculation of price limits 
            //    if the product selection has changed or if an existing
            //    data row has been selected for editing
            FieldValue oldProductID = (FieldValue)this.GetProperty("Session_ProductID"); 
            if (oldProductID == null || productID.Value.ToString() != oldProductID.Value.ToString())
            {
                decimal basePrice = Convert.ToDecimal(unitPrice.Value);
                if (!triggerFieldName.Equals("ProductID"))
                    basePrice = Convert.ToDecimal(unitPrice.OldValue);
                this.SetProperty("Session_UnitPrice", basePrice);
                this.SetProperty("Session_ProductID", productID);
                if (triggerFieldName.Equals("ProductID"))
                {
                    quantity = 1;
                    UpdateFieldValue("Quantity", quantity);
                    discount = 0;
                    UpdateFieldValue("Discount", discount);
                    Result.Focus("Quantity");
                }
            }
            // 3. Adjusting base price for an existing record
            decimal originalUnitPrice = (decimal)this.GetProperty("Session_UnitPrice");
            if (originalUnitPrice == null || originalUnitPrice == 0)
            {
                originalUnitPrice = Convert.ToDecimal(unitPrice.OldValue);
                this.SetProperty("Session_UnitPrice", originalUnitPrice);
            }
            // 4. validate Unit Price field
            if (success)
            {
                decimal minPrice = originalUnitPrice;
                decimal maxPrice = originalUnitPrice * (decimal)1.05;
                success = unitPrice != null;
                if (!success)
                    Result.Focus("UnitPrice", "Please enter the price.");
                else
                {
                    decimal price = Convert.ToDecimal(unitPrice.Value);
                    success = minPrice <= price && price <= maxPrice;
                    if (!success)
                        Result.Focus("UnitPrice", "This price must be between {0:c} and {1:c}", 
                            minPrice, maxPrice);
                }
            }
            // 5. validate Quantity field
            if (success)
            {
                success = quantity != null && quantity > 0;
                if (!success)
                    Result.Focus("Quantity", "The quantity must be greater than zero.");
            }
            // Validate Discount field
            if (success)
            {
                // 6. If value > 1, then convert value to percentage
                if (discount > 1)
                {
                    discount = discount / 100;
                    UpdateFieldValue("Discount", discount);
                }
                // 7. Confirm that Discount is between 0.00 and 0.99
                success = discount != null && discount >= 0.00 && discount <= 0.99;
                if (!success)
                    Result.Focus("Discount", 
                        "The discount must be between 0.00 and 0.99 (0% - 99%).");
            }
            // 8. Wrapping Up
            if (commandName == "Calculate" || !success)
                this.PreventDefault();
        }
    }
}

Visual Basic:

Imports MyCompany.Data
Imports System
Imports System.Data

Namespace MyCompany.Rules
    
    Partial Public Class OrderDetailsBusinessRules
        Inherits MyCompany.Data.BusinessRules
        <Rule("r100")> _
        Public Sub r100Implementation(ByVal orderID As Nullable(Of Integer),
                                      ByVal orderCustomerID As String,
                                      ByVal orderCustomerCompanyName As String,
                                      ByVal orderEmployeeLastName As String,
                                      ByVal orderShipViaCompanyName As String,
                                      ByVal productID As Nullable(Of Integer),
                                      ByVal productProductName As String,
                                      ByVal productCategoryCategoryName As String,
                                      ByVal productSupplierCompanyName As String,
                                      ByVal unitPrice As FieldValue,
                                      ByVal quantity As Nullable(Of Short),
                                      ByVal discount As Nullable(Of Single))
            ' 1. If the collected values are not valid then do not enforce the rule.
            '    The client library will instruct the user to correct the input.
            Dim success As Boolean = Me.ValidateInput()
            Dim commandName As String = Me.Arguments.CommandName
            Dim triggerFieldName As String = Me.Arguments.Trigger

            ' 2. Reset the base price for calculation of price limits 
            '    if the product selection has changed or if an existing
            '    data row has been selected for editing
            If Me.GetProperty("Session_ProductID") Is Nothing OrElse
                productID.Value.ToString() <> Me.GetProperty("Session_ProductID").ToString() Then
                Dim basePrice As Decimal = Convert.ToDecimal(unitPrice.Value)
                If Not triggerFieldName.Equals("ProductID") Then
                    basePrice = Convert.ToDecimal(unitPrice.OldValue)
                End If
                Me.SetProperty("Session_UnitPrice", basePrice)
                Me.SetProperty("Session_ProductID", productID)
                If triggerFieldName.Equals("ProductID") Then
                    quantity = 1
                    UpdateFieldValue("Quantity", quantity)
                    discount = 0
                    UpdateFieldValue("Discount", discount)
                    Result.Focus("Quantity")
                End If
            End If
            ' 3. Adjusting base price for an existing record
            Dim originalUnitPrice As Nullable(Of Decimal) =
                CDec(Me.GetProperty("Session_UnitPrice"))
            If originalUnitPrice Is Nothing OrElse originalUnitPrice = 0 Then
                originalUnitPrice = Convert.ToDecimal(unitPrice.OldValue)
                Me.SetProperty("Session_UnitPrice", originalUnitPrice)
            End If
            ' 4. validate Unit Price field
            If success Then
                Dim minPrice As Decimal = originalUnitPrice
                Dim maxPrice As Decimal = originalUnitPrice * CDec(1.05)
                success = unitPrice IsNot Nothing
                If Not success Then
                    Result.Focus("UnitPrice", "Please enter the price.")
                Else
                    Dim price As Decimal = Convert.ToDecimal(unitPrice.Value)
                    success = minPrice <= price AndAlso price <= maxPrice
                    If Not success Then
                        Result.Focus("UnitPrice",
                                     "This price must be between {0:c} and {1:c}",
                                     minPrice, maxPrice)
                    End If
                End If
            End If
            ' 5. validate Quantity field
            If success Then
                success = quantity IsNot Nothing AndAlso quantity > 0
                If Not success Then
                    Result.Focus("Quantity", "The quantity must be greater than zero.")
                End If
            End If
            ' Validate Discount field
            If success Then
                ' 6. If value > 1, then convert value to percentage
                If discount > 1 Then
                    discount = discount / 100
                    UpdateFieldValue("Discount", discount)
                End If
                ' 7. Confirm that Discount is between 0.00 and 0.99
                success = discount IsNot Nothing AndAlso discount >= 0.0 AndAlso discount < 1
                If Not success Then
                    Result.Focus("Discount",
                                 "The discount must be between 0.00 and 0.99 (0% - 99%).")
                End If
            End If
            ' 8. Wrapping Up
            If commandName = "Calculate" OrElse Not success Then
                Me.PreventDefault()
            End If
        End Sub
    End Class
End Namespace

The business rule is written in C# or Visual Basic. The fields are present in the arguments of the method. Changing the data type of the argument to FieldValue allows accessing additional properties of the field.

Click Browse button on the toolbar, sign in as admin/admin123% and navigate to Customers / Order Details page.

The business rule will be engaged as soon as a new record is being entered or an existing one is modified. The business rule will react to changes to the fields specified in the Context Fields property of UnitPrice when Calculate action is raised. The field UnitPrice depends on itself. It does not matter which application field is used to trigger the Calculate action. The only field that cannot trigger the calculation is ProductID. The Context Fields of a lookup will provide filtering information for the lookup window. Any field names in the Context Fields of ProductID will make the client library treat them as context filters, which will prevent users from seeing any products in the lookup window.

Business Rules provide a true abstraction level and separation from the user interface. The business rule is not actively selecting user interface elements to collect input values, which allows flexible modification of the presentation and the rule itself. The same business rule can service any number of data controller views regardless of the view types.

There are eight distinct steps in the business rule.

1. Initial Input Validation

The client library automatically performs basic validation of the entered values. The rule declares success variable, which is used to determine if any special validation needs to be applied to the fields.

The command causing the rule to execute is stored in commandName variable. The possible values are Calculate, Insert, or Update.

The rule also makes a note of the field that has triggered the business rule. The trigger field name will be known only when Calculate action is raised. The possible triggers are ProductID, UnitPrice, Quantity, and Discount.

This is an example of a basic validation that does not require custom coding.

Basic validation performed on the client.

2. Determination of The “Base” Price

The rule will memorize the last ProductID and UnitPrice in the properties of the data view instantiated on the browser page. The base price is used to ensure that users do not enter lesser values and to prevent the price inflation by more than 5%. If the product has just been changed, then the rule will reset values of fields Quantity and Discount and set the focus on the Quantity field.

This screen shot shows the form after the product selection.

The unit price is copied from the Product.

3.  Adjusting Base Price for Existing Records

If the user is editing an existing record then the old (original) value of the UnitPrice is memorized in the data view properties.

4. Price Validation

The business rule figures the minimum and maximum price that can be entered by the user. If the price is blank, then the user is instructed to enter a value. If the price is out of range, then the user is forced to correct the problem.

This is the price validation in the form view.

Validation is performed on the unit price.

This is how the price validation is performed in the data sheet view.

Validation performed in data sheet view.

5. Quantity Validation

The rule ensures that a positive Quantity is entered.

Validation to ensure positive quantity.

6.  Automatic Conversion of Discount

The Discount column in Order Details table has the Single type. There is also a database constraint that requires the value to be between zero and one. The business rule will help the user by automatically converting the discount to a fraction of 100.

A user has entered a value greater than one in this screenshot.

Discount is converted to a percentage.

The value is automatically converted when the user leaves the field.

7. Discount Range Validation

If the end user is trying to enter a particularly high discount that remains out of range even after automatic conversion, then the validation error is displayed.

Validation is performed on Discount field.

8. Wrapping Up

The default behavior of the client library is to send the collected values to the server for processing by application. The business rule will prevent this from occurring. The business rule prevents server-side execution of Calculate action. It is also preventing server-side processing of Insert and Update if the validation has not been successful.

Watermark Property

$
0
0

A common practice when developing web applications is to display placeholder text in a field to indicate the expected input to the user. Let’s implement a watermark on the Order Details create form of a sample Northwind web app.

Start the Project Designer. In the Project Explorer, double-click on Customers / Order Details / container1 / view1 (OrderDetails, grid1) / createForm1 / c1 – New Order Details / UnitPrice data field node.

UnitPrice data field in createForm1 of OrderDetails controller.

Make the following change:

PropertyValue
Columns30
WatermarkPlease enter a price per unit for this order.

Save the field. On the toolbar, press Browse.

Navigate to the Order Details page, and create a new record. Note that the watermark is displayed in the Unit Price field.

Watermark text is displayed inside the Unit Price field.

When a user starts entering a value in the field, the watermark text disappears.

The watermark text disappears when the user enters a value.

Announcing Multi-User Support in Project Designer

$
0
0

Code On Time is pleased to announce that the upcoming 8.0.0.0 release will allow users to share work done in the Project Designer with other developers to enable teamwork and collaboration.

Changes will be automatically submitted to the server. Revisions made by other developers will be downloaded whenever you start Designer. Team members, projects, and revisions can be viewed and managed online.

To get started, select your project and select Sync.

Activate the 'Sync' project action to share work with other developers.

Payment email and activation code can be used as user name and password to start synchronization for a project. Accounts for other users can be created online.

Configuring the project synchronization settings.

Each member can also be provided with a temporary activation code to protect your purchase. Account owners will be able to create, delete, or disable user accounts and temporary activation codes when the composition of a team has changed.

This feature is designed to be used alongside existing source control systems, such as Microsoft Team Foundation Server, GitHub, or Subversion. A tutorial explaining how to use a source control system with the new Project Designer synchronization will be available shortly.

We will be offering this synchronization service at no charge.

The synchronization software will also be available for purchase separately. Customers will be able to deploy the software on their own servers for additional protection of their intellectual property.

The new release with support for synchronization will be available in September, 2013.

The release will also include extended support for mobile devices.

Configuring Active Directory Membership

$
0
0

Code On Time web application generator allows using Microsoft Active Directory for authentication and role membership.

Configuring Active Directory Authentication

Create a new Web Site Factory application. When configuring the Authentication and Membership screen, click the checkbox next to “Enable Active Directory authentication…”. The Active Directory Configuration textbox will be displayed below the checkbox with a sample configuration.

Enabling Active Directory authentication and role provider and specifying the configuration properties.

Replace the highlighted values in the picture above with the address of the server and login details of the administrative account that will be used for interaction with the Active Directory. Additional Active Directory Membership Provider  configuration properties may also be specified in the format “Property Name = Value”.

An example of an actual Active Directory configuration.

Continue to generate the web application. You may now log in using your AD credentials. Note that the first login may take some time to complete. A dynamic wait indicator will be displayed as the request is being processed.

Logging into the web app using AD credentials.

User Roles

Interactions with the Active Directory may be time-consuming. The application will cache roles obtained from the Active Directory for 10 minutes by default.

You can also specify a custom blacklist and whitelist to limit the roles that are recognized by the application.

The following configuration properties control role management.

PropertyDescriptionDefault Value
Enable Role CacheThis property will enable or disable caching of user roles.True
Role Cache Time In MinutesThis property specifies the length of expiration for cached user roles.10
Role BlacklistSpecifies an optional list of roles that will not be recognized by the application. 
Role WhitelistSpecifies an optional list of roles. The application will recognize only the roles listed in the whitelist if this list is not empty. 

The properties can be specified in the Active Directory configuration as shown in the picture below:

Example of role configuration properties.

The following Active Directory roles assigned to user accounts are blacklisted by default. The property Role Blacklist will extend the default exceptions.

Domain Guests
Domain Computers
Group Policy Creator Owners
Guests
Domain Users
Pre-Windows 200 Compatible Access
Exchange Domain Servers
Schema Admins
Enterprise Admins
Domain Admins
Cert Publishers
Backup Operators
WINS Users
DnsAdmins
DnsUpdateProxy
DHCP Users
DHCP Administrators
Exchange Services
Exchange Enterprise Servers
Remote Desktop Users
Network Configuration Operators
Incoming Forest Trust Builders
Performance Monitor Users
Performance Log Users
Windows Authorization Access Group
Terminal Server License Servers
Distributed COM Users
MTS Impersonators
Everyone
LOCAL
Authenticated Users


Announcing Mobile Client, Mobile Factory, Active Directory Membership, and Synchronization Service in Release 8.0.0.0

$
0
0

For the past few months we’ve been busy preparing a collection of exciting features that are included in the Code On Time release 8.0.0.0. Most customers will receive an automatic notification to download the software by the end of this week.

Mobile Client Library

With this release we are turning Code On Time application generator in a mobile app powerhouse. The term “mobile app” is used quite loosely in this day and age. A few HTML pages wrapped in a native shell is what passes as a modern mobile application.

Web applications created with Code On Time are simultaneously supporting desktop and mobile clients. The application framework in the foundation of the generated apps automatically detects the client capabilities and links a corresponding client library to the pages rendered in a web browser on the native device. Exactly the same page will render a different GUI on desktop and mobile devices. If you are building a desktop app, then you have developed a mobile version already!

Navigation menu of a mobile user interace in web app created with Code OnTime app generator A list of products rendered in a mobile client by an app created with Code On Time application generator

We are using jQuery Mobile  to offer touch-enabled user interface in the new mobile client library. The current release is based on jQuery Mobile 1.4.0 Beta.

Applications are rendered uniformly in all popular mobile devices. Desktop users can easily enable the mobile GUI by specifying a switch in the URL of any page.

The key features of the mobile client library:

  • The latest styling found in devices from Apple
  • Touch-enabled user interface elements
  • Progressive loading of data. There are no “next” or “previous” buttons.
  • Tap-and-hold techniques allows selecting multiple items in lists.
  • Unified sliding panel with the navigation links.
  • Unified sliding panel with context actions.

The initial release of mobile client library supports read-only interaction with data.

jQuery Mobile has significantly changed starting with version 1.3.0, which has required a complete re-write of the original implementation of the library. We are not complaining – there are significant performance improvements. New user interface components are integrated throughout the Mobile Client Library.

Users will be to see the mobile client library in action as soon as an app is rebuild with the new release of the app generator. We expect to offer ability to modify data in mobile clients by the middle of November 2013.

Ability to render alternative user interface on desktop and mobile devices is available in Unlimited edition of the app generator.

Mobile Factory

The new project type will be available in the new release. Premium edition users will be able to create mobile-only apps that will render “mobile” user interface on all devices including desktop.

image

Active Directory Authentication and Membership

Integration with Microsoft Active Directory is now available in Unlimited edition. It is now possible to authenticate users by Active Directory domain. Active Directory groups are recognized as user roles.  Read configuration instructions at http://codeontime.com/learn/security/active-directory.

Synchronization Service

It’s been our goal to allow maximum efficiency in team development. We’ve been working diligently on a solution, which is now fully integrated in application generator release 8.0.0.0. Step-by-step tutorials explaining configuration of a project for multiple developers will be published shortly.

Universal Mobile/Desktop Client, Mobile Factory, Active Directory, Synchronization Service

$
0
0

Code On Time release 8.0.0.0 introduces support for Universal Mobile/Desktop Client. The unique architecture of generated apps allows re-interpreting of the application user interface presentation. The original “Desktop” client library now has a “Mobile” counterpart. Apps created with Unlimited edition will automatically detect a mobile device and render an alternative touch-friendly GUI for the app.

The mobile client library is based on popular jQuery Mobile framework. The current implementation of the library allows read-only access to data. We are finalizing the editing capabilities and expect to have them rolled out by the middle of November 2013. Sorting, filtering, and advanced search will be included in the mobile client in the next couple of weeks.

The new project Mobile Factory allows creating apps with “mobile-only” user interface. This project is available without restrictions in Premium and Unlimited editions. Free and Standard editions allow creating Mobile Factoryprojects with up to ten tables.

Membership and authentication options have been extended to include Active Directory. Application users can sign-in with the standard fly-over login window or custom login. User identity is authenticated by Active Directory server. User roles are derived from Active Directory groups assigned to the user. This feature is available in Unlimited edition only.

New cloud-based Synchronization Service allows automated synchronization of Project Designer logs to simplify team development. Single users will also benefit from a cloud history of designer logs. Online portal allows management of design revision. The new service is designed to complement existing source control systems, such as Team Foundation Server. The synchronization service is offered at no charge. Organizations interested in hosting their own designer synchronization service may request pricing here.

Unlimited edition now includes SaaS (Software as a Service) support with full user authentication. Code On Time apps can be integrated into external web sites while running side-by-side. Examples will be available in the near future.  We expect to use this model to support the newest version of Microsoft SharePoint and other similar products in the future releases.

This release includes the following features, enhancements, and bug fixes.

  • Web App Factory, Azure Factory, and Web Site Factory support “_mobile” URL parameter. The “true” value will enable mobile GUI on desktop computers. Value “false” can be used to disable mobile GUI on mobile devices when needed. Empty value will delete the cookie.
     
  • Mobile Client displays “Call” context option for the fields tagged as mobile-action-call. Data fields with “Phone” in the name are tagged automatically.
     
  • Mobile Client supports tags mobile-item-heading, mobile-item-desc, mobile-item-label, mobile-item-count, mobile-item-aside, mobile-item-thumb and mobile-item-para to enable easy formatting of grid views presented on mobile devices. By default, the Mobile Client will automatically choose the fields to display based on their Show In Summary flag. Presence of any tag on a data field will override the default behavior.
     
  • New “Device” property of pages supports “Auto”, “Desktop”, and “Mobile” options. The default value is “Auto”. “Desktop” pages are not accessible in the menu or address bar from mobile clients and vice versa. This allows implementing pages that work only on mobile or only on desktop devices.
     
  • The current implementation of Mobile Client is based on jQuery Mobile 1.4 beta.
     
  • Class ApplicationServices implement EnableMobileClient static Boolean property that allows disabling Mobile Client UI. Create a partial class ApplicationServices in a dedicated class file, override method RegisterServices and assign “false” to he EnableMobileClient to disabled mobile client.
     
  • Standard TableOfContents and Welcome user controls include markup of mobile content.
     
  • New JavaScript and CSS versioning system is available in Web App Factory, Web Site Factory, and Azure Factory. File “DataAquarium.Version.xml” is included in the root of the projects. The file stores the application version number. The number starts at zero. It is incremented every time the application is published from the app generator. JavaScript and CSS references are enhanced with a suffix to force seamless re-loading on the client machines after deployment. For example, the suffix of a 7th revision of an app may look as follows in the actual combined script reference:
     
    ”../appservices/combined-8.0.0.7.en-us.js?_mobile”
     
    The  first part “8.0.0” reflects the version of the app generator. The last number “7” if the application revision.
     
  • Data controller service will not create data controller requests if a client is not authenticated by the app.
     
  • App services are exempt from "Authenticated user" requirement imposed by Controller.CreateConfiguration method.
     
  • Desktop Client correctly selects a record in a grid view if the record was created or changed in a modal form.
     
  • Active Directory authentication and groups are supports in Web App Factory, Web Site Factory, and Azure Factory apps created with Unlimited edition.
     
  • Combined script is integrated in Web App Factory, Web Site Factory, and Azure Factory in apps created with Unlimited edition. A single compressed script is returned to the client browser. This improves the download speed of pages. The combined script name accounts for user interface culture, “mobile” flag, and version.
      
  • App generators now supports Azure SDK 2.1
     
  • REST serialization processor correctly serializes Guid values.
     
  • User Controls are correctly opened in Visual Studio when selected in Project Designer.
     
  • Membership bar will detect and clear anchors from the URL when reloading a page.
     
  • Missing “type” attribute on “command” node of a data controller will not cause a runtime error.
     
  • Project Designer will clear contents of "empty" nodes when an empty text is assigned to an element. This eliminates the need to create unnecessary revisions in source control systems.
     
  • Solutions files are not re-generated anymore to allow modifying the solutions contents.
     
  • All projects types will now correctly reload if the source code has been opened in Visual Studio at the time of code generation.
     
  • BLOB Adapter implementation has been enhanced to work better with MySQL databases.
     
  • EASE auditing will correctly work with read-only fields.
     
  • Multiple business rule firing has been corrected. Caused by business rule blacklisting by ID instead of name.
     
  • Method MembershipProvider ResetPassword in custom membership providers has been fixed to support hashed passwordAnswer.
     
  • jQuery 10.2 and jQuery UI 1.10.3, are integrated in the client library.
  • New Watermark property is now available for data fields.
     
  • Fixed Oracle 4.5 projects not correctly hooking up ODP assembly. 
      
  • Desktop Client makes use of jQuery when dealing with various dimension calculations. We are abandoning Ajax Control Toolkit in the future releases.

Tools for Excel and Team Work

$
0
0

Code On Time release of Tools For Excel 1.0.9.0 now supports team work. Developers can take advantage of the cloud synchronization service to automatically merge Project Designer changes.

Team work requires Code On Time 8.0.0.0 or newer. Developers can share work done in Microsoft Excel with other team members.

Commit Confirmation is displayed when project changes are synchronized . User can enter notes describing modifications.

Project members will see a confirmation to download new revisions done by other developers when synchronization is initiated and new revisions are available.

Creating a Team Foundation Service Account

$
0
0

TFS organizes Visual Studio projects and other miscellaneous files into folders called “team projects”, which are themselves organized by collection. Code On Time apps are standard Visual Studio projects, which allows using TFS to keep track of source code changes. All you need is a Team Foundation Service account.

It is easy to sign up for a new Team Foundation Service account.

Start your browser and navigate to http://tfs.visualstudio.com. Click on “Sign up for free” link.

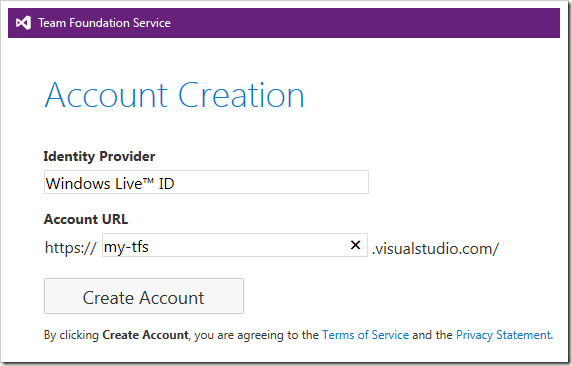
Specify a URL for your Team Foundation Service and press Create Account.

Specifying an Account URL for a new TFS account.

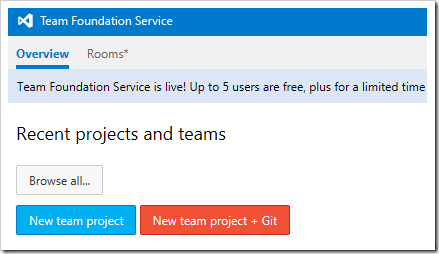
When complete, you will be redirected to the TFS start page.

To begin, click on the “New team project” button.

The start page for TFS.

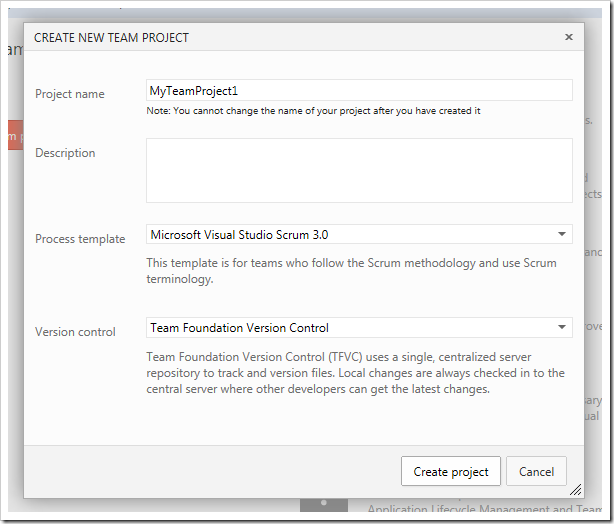
Specify a name, and press Create Project.

Creating a new team project in TFS.

Your “team project” is now ready.

Sharing Work with Other Developers

$
0
0

Code On Time’s synchronization service is designed to work in unison with Team Foundation Service and other application lifecycle management systems. Let’s see an example of a typical workflow involving TFS and Code On Time synchronization service.

Synchronizing

Any changes done in the Project Designer must be committed to the synchronization service in order to share them with other team members. App generator will prompt to synchronize changes when the developer leaves the Designer if any uncommitted changes are detected.

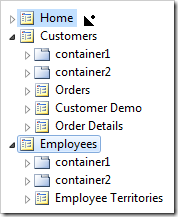
For example, in the Project Explorer, drop Employees page node on the right side of Home page.

Dropping Employees page node on the right side of Home page.     Employees page is placed after Home page.

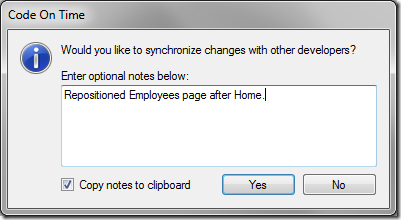
On the Project Designer toolbar, press Exit. Changes will be detected and the synchronization prompt will be displayed.

Entering notes for the revision and committing.

Enter notes for the revision, and press Yes to commit. The comment has been copied to the clipboard if the checkbox “Copy notes to clipboard” has been selected. When complete, continue to regenerate the web app.

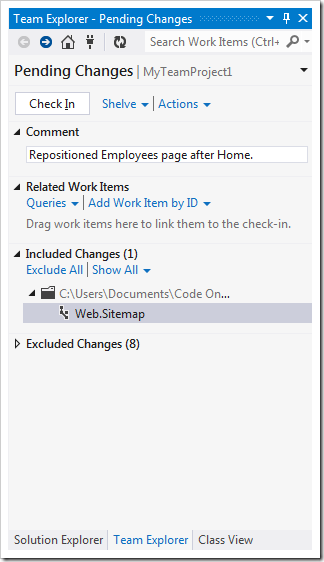
Open the project in Visual Studio and activate the Team Explorer window. Notice that one file has changed. In the comment box under the Check In button, press Ctrl+V to paste the comment from the clipboard. Then press Check In.

Committing code base changes in TFS.

Updating

Start the app generator, select the project, and activate the Project Designer. The generator will contact the synchronization service to find any new revisions not available on the computer. If there is a new revision available, a prompt to update will be displayed.

The generator has detected a new revision.

Press Yes to download the latest revision. The generator will download new Project Designer revisions done by other developers. Then it will automatically refresh the project. The Project Designer will open when refresh is completed.

If you generate or browse the project, then only Designer changes will be reflected in the app. If the other team members are writing code business rules or creating additional modifications of application framework, then you may need to get the latest version of the source code.

Press Develop on the Project Designer toolbar to open the project in Visual Studio. In the Solution Explorer, right-click on the solution and press Get Latest Version (Recursive).

Updating the code base to the latest version.

Visual Studio will proceed to download the latest versions of any modified business rules, user controls, and stylesheets.

At this point, you are guaranteed to have the latest version of the application source code.

Continue to regenerate the application by pressing Browse on the Project Designer toolbar.

Placing a Code On Time App under Source Control

$
0
0

Suppose that we have an application called “Northwind” that we need to place under source control with Microsoft Team Foundation Service (TFS).

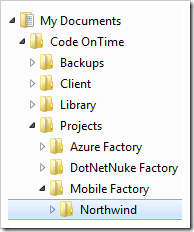
Web apps created with Code On Time are contained in a single folder and organized by project type under My Documents\Code OnTime\Projects.

Location of the Northwind project.

The folder that needs to be synchronized is located at ~\My Documents\Code OnTime\Projects\Mobile Factory\Northwind in the picture above.

TFS organizes projects and assorted files into groups called “team projects”, which are themselves organized into collections. We will need to connect the ~\My Documents\Code OnTime\Projects\Mobile Factory\Northwind folder to a specific folder inside of a team project. The picture below shows the server folder organization in Source Control Explorer of Visual Studio after the project is added to TFS.

Note that Mobile Factory and Web Site Factory apps are contained under a master folder with the same name as the application project. The master folder also stores the Visual Studio solution file for the project. This is how TFS organizes projects of these types.

Folder layout in the TFS server.

Every other project type does not have a master folder. The Visual Studio solution file is stored directly in the project folder.

The Visual Studio solution file is stored directly in the project folder.

Let’s create a project and add it to the Team Foundation Service.

You will need to open a new TFS account if you do not already have one.

Connecting a Project to Team Foundation Server

Create a new web application. When complete, open the project in Visual Studio. Open the Team Explorer toolbar, typically available in the same window as the Solution Explorer. Click on the Connect icon on the toolbar to connect to team projects.

Connecting to a team project in Visual Studio.

Select the “Connect” link to activate the Connect to Team Foundation Server window. Click on the “Servers…” button.

Adding a TFS server.

Press “Add…”, and enter the URL of your server in the textbox.

Specifying the URL of a team foundation server to add to Visual Studio.

Press OK to save the server. You may need to log in to access the server. If there are no errors, press Close to close the Servers window, select the team project in the Team Projects list, and press Connect.

Adding the Solution to Source Control

Switch back to the Solution Explorer tab. Right-click on the solution, and press Add Solution to Source Control.

Adding a solution to source control.

Select the Team Project in Add Solution to Source Control window. Create a new folder to organize your projects and specify a name for the solution folder that the web app will be saved in. Press OK to add the solution.

Specifying the location on the team foundation server that the project will be saved to.

To perform the initial check-in, right-click on the solution in the Solution Explorer and press “Check In…”.

Checking in the project.

The Team Explorer window will be activated. Enter an optional comment.

Entering an optional revision comment.

Visual Studio will decide on its own which files will be under source control. There are several files that need to be excluded or included under source control. This will depend on the project type.

Application generator maintains several XML files that describe the application design. Some of the files are not necessary for the application to run and do not need to be placed under source control.

Excluding Files in Mobile Factory or Web Site Factory

Visual Studio will decide to include all project files in a Mobile Factory or Web Site Factory project.

Click on “Go to All Changes”, hold Ctrl, and select the following files in the list:

Application.Baseline.xml
Application.Cache.xml
Application.Log.xml (if present)
Controllers.Baseline.xml
Controllers.Cache.xml
Controllers.Log.xml (if present)
DataAquarium.Metadata.xml

Right-click, and press Exclude.

Excluding the project files from source control.

Excluding Files in Web App Factory, Azure Factory, DNN Factory, and SharePoint Factory

Web App Factory, Azure Factory, DNN Factory, and SharePoint Factory require the inclusion of essential project files.

Under the Excluded Changes section, click on “Detected:…”.

Clicking on "Detected..." to include several files that are excluded by default.

Select only the following items: “ClientLibrary.*.txt”, “DataAquarium.Project.xml”, and “DataAquarium.Version.xml”.

Including the correct files so that the app generator can still handle the project.

Press Promote to add the files to the pending changes.

Committing the Revision

Press the Back icon on the Team Explorer toolbar, and then press Check In.

Checking in the project.

The project code is now under control of Team Foundation Server.

Activating Project Synchronization

Start the web app generator. Click on the project, and select Sync.

Selecting Sync option in the Project Actions page.

Enter your user name and password in the relevant fields. If you have not yet created an account, enter your purchase email and activation code.

Entering username and password in order to configure synchronization.

Press Save, and the web application generator will proceed to upload your project.

Note that your account must be marked as an Account Owner or Project Manager in Code On Time Account Manager in order to add a new project.

Now, the other team members can get the latest version of the project from Team Foundation Service and establish synchronization of Project Designer change logs.

Adding New Project Members

In order for other team members to work on the same project, they must be added to the Team Project in TFS and the synchronization service account.

First, navigate to https://manage.codeontime.com and proceed to log in.

d

Navigate to the Users page. On the action bar, select New User.

Adding a new user to the account.

Enter the user details. Make sure to mark the user as enabled. Also select the checkbox next to the project name.

Specifying details for the new user account.

Press OK to save the new user account. Select Activation Code | Email action on the action bar to send the personal activation code to the user.

Emailing the personal activation code to the new user.

Note that personal activation code is different from the Code On Time product activation code. The personal activation code will allow developers to activate the app generator and synchronize Project Designer changes.

Next, navigate to URL of your team foundation service. In the top-right corner of the page, click on the Gear icon.

Selecting the Gear icon in TFS website to access settings.

Navigate to the Team of the project, and click on “View the team administration page”.

Accessing the team administration page.

In the list of Team members, press Add… | New User.

Adding a user to the project.

Type in the Windows Live ID of the new user, and press Save Changes.

Adding a user to the project.

The user will now have access to the project stored in Team Foundation Service.

Getting Code on the Project Member Computer

The team member must start Visual Studio and log into the TFS server using the their own credentials. The following steps will need to be performed.

In the menu, press File | Source Control | Advanced | Workspaces….

Managing workspaces from Visual Studio.

Press Add… in the bottom left corner.

If the project type is Mobile Factory or Web Site Factory, two mappings are needed. The first mapping will correctly place the solution file in the ~\Code OnTime\Solutions folder. The second mapping will place the code under the ~\Code OnTime\Projects folder.

Adding two working folders. One is for solution and the other is for the project.

If the project type is Web App Factory,Azure Factory, DotNetNuke Factory, or SharePoint Factory, only one folder needs to be mapped to ~\CodeOnTime\Projects\PROJECT_TYPE\PROJECT_NAME.

Source control mapping for Web App and Azure Factory projects.

Press OK to save the mappings.

When Visual Studio prompts to download the source code files, confirm and wait for the download to finish.

Visual Studio downloading the source code.

Once the download is complete, switch back to the app generator and refresh the start page by pressing F5. Click on the newly added project and press Sync. Add your credentials and press Save.

Saving synchronization settings for the project.

The generator will proceed to download the latest version of the web application revisions and refresh the project.

Press Design to activate the Project Designer or Generate to view the application in a browser.

Overview of Application Lifecycle Management

$
0
0

It is a common practice to place the application source code under the control of an ALM (application lifecycle management) system.

Web apps with Universal Mobile/Desktop Client created with Code On Time are standard ASP.NET applications. The entire source code is included in each project. There are no black-box DLLs or hidden runtimes.

It is easy to place a web application created with Code On Time under source control of an ALM.

Application generator maintains XML log files to track revisions of the project design alongside the source code of an app. This allows working on the app in a disconnected mode. It also makes it easy to merge changes from multiple developers.

The designer log changes are incremental. If two developers have changed the application design, then the XML log files must be merged, followed by a Refresh of the application design.  

Code On Time offers a free cloud synchronization service that enables automatic exchange of designer changes between team members. The project synchronization software is also available for purchase for in-house hosting.

Microsoft Team Foundation Service (TFS) is a popular ALM system. It is easy to place a Code On Time app under source control with TFS.


Allowing Access to Data Controller Views on Public Pages

$
0
0

The client library of apps created with Code On Time allows only authenticated users to interact with data. If a user is not authenticated by the app then a request to retrieve data will be denied. There are scenarios when anonymous users must be allowed to interact with application data.

Let’s create a public Customer Sign Up Form in the Northwind sample to illustrate this situation.

Select the project on the start page of the app generator and activate Project Designer. Create a new page with the following properties:

PropertyValue
NameSignUpForm
Roles?

Value “?” specified in Roles will allow anonymous users to access page with signing in.

Right-click Customers data controller on Controllers tab and choose Copy in the menu.

Copying data controller reference to the clipboard.

Switch back to Pages tab, right-click Sign Up Form and choose Paste in the context menu.

Pasting a data controller reference on page of an app.

A data view view1 in container c101 will be created under the page node Sign Up Form.

A data view on the page on app created with Code On Time app generator.

Configure the data view as follows.

SectionPropertyValue
Startup ActionCommand NameNew
Startup ActionCommand ArgumentcreateForm1

Click Generate on the Project Designer toolbar.

Annonymous users are not authorized to access application data by default in Code On Time apps in Mobile and Desktop client.

The exception at the top of the page indicates that the view createForm1 is private. The anonymous user is not authorized to access data.

If you click Login and sign in as user / user123%, then an empty New Customers form will be displayed.

If we want to allow anonymous users to create new customer records using createForm1, then the view must be configured for Public access. Also the standard actions of the data controller Customers need to be adjusted to work in a perpetual “new customers” loop. The user will be prompted to create a new customer after a successful entry of a new record instead of displaying a list of existing customers.

Select the view Sign Up Form / c101 / view1 (Customers) in Project Explorer.

A data controller view selected on page in Project Explorer of Code On Time app generator.

Change the Access property of the view.

PropertyValue
AccessPublic

Now configure the action state machine of the data controller.

Create a new action in action group Sign Up Form / c101 / view (Customers) / Actions / ag2 (Form) with these properties:

PropertyValue
Command NameNew
Command ArgumentcreateForm1
When Last Command NameInsert
When HRef (Regex)SignUpForm

The action Sign Up Form / c101 / Actions / ag2 (Form) / a100 will be activated only when the page Sign Up Form is loaded in a web browser. The action will display createForm1 in New mode every time a new record is created.

Then select each of the actions ag2 (Form) / a8, ag6 (ActionBar) – New / a3, and  ag6 (ActionBar) – New / a4 shown in the picture to configure them to be inactive on the page SignUpForm.

PropertyValue
Whe HRef (Regex)false:SignUpForm

Data controller actions that must be deactivated when SignUpForm is displayed to the user.

Property When HRef (Regex) is a regular expression evaluated against the current URL loaded in the address bar of the browser. If there is match then the action is active and taken into consideration by the action state machine. Otherwise the action is considered to be inactive. Placing “false:” in front of the property value will make an action inactive if the regex following after “false:” is matched to address bar URL.

Browse the app without signing in and confirm that new customers can be entered on Sign Up Form by anonymous users.

Customer 'Sign Up Form' in action.

The form will remain in “New” mode after a new customer is created.

Log in to verify that the record is stored in the database.

Authenticated users can interact with a full list of customers in our sample.

Miscellaneous Hot Fixes

$
0
0

Code On Time releases 8.0.1.0 introduces the following features and hot fixes:

  • Learn about new synchronization service and how to share Project Designer changes with other developers involved in your project. Use Team Foundation Service to implement version control of application source code.
     
  • SharePoint Factory apps will not raise exceptions when a Web Part is inserted in a live page of a SharePoint site.
     
  • New property Access allows the data controller views to be exposed on public pages. The default value of the property is “Private”. Anonymous users are not authorized to see data views placed by developers on publicly available application pages. Set "Access" property to "Public" to allow anonymous users to interact with the view.
     
  • Rich text input mode of data fields will not cause an exception in a mobile client.
     
  • Synchronized Project Designer change logs of legacy applications will be correctly merged after automatic refresh.
     
  • Property ApplicationServices.Version correctly treats application version as a string. The previous implementation may have resulted in a compilation error when generated on computers with some European locales.
     
  • Permalinks will not cause exceptions in the Mobile Client.

Account Manager: Registering Purchases

$
0
0

Navigate to http://manage.codeontime.com/pages/purchases.aspx.

You will see a list of purchases tied to the current account. The user limit and expiration date is also displayed.

The "Purchases" page displays a list of purchases associated with the account.

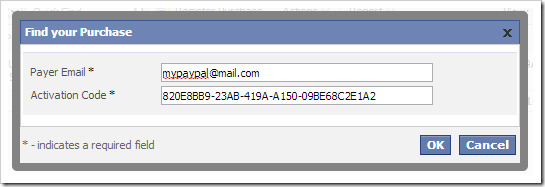
Add a new purchase to the account by pressing Register Purchase on the action bar. Enter  the payer email and activation code, and press OK. If the purchase is found but not yet registered in the Account Manager, it will be added to your account.

The payer email and activation code is entered in the Find Your Purchase form.


Note that the new purchase must be of the same edition as the original purchase of the account.

Account Manager: Managing Projects

$
0
0

Navigate to http://manage.codeontime.com/pages/projects.aspx.

Projects configured for synchronization are displayed here.

Viewing a list of projects.

The project can be marked as deleted by pressing Delete on the action bar. Users will not be able to share changes with other project members if the project has been deleted.

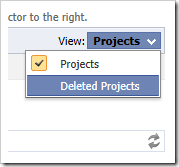
Select “Deleted Projects” from the view selector in the top-right corner to view a list of deleted projects.

Viewing deleted projects by using the view selector.

Restore the project by pressing “Restore” on the action bar.

Restoring a deleted project.

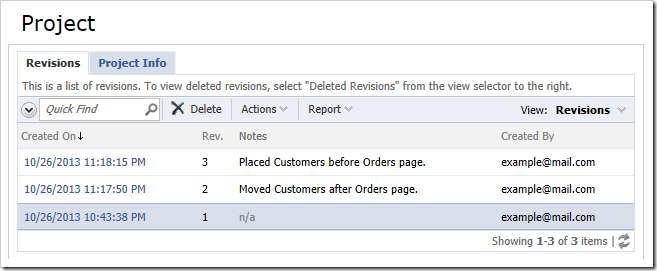
Use the view selector to return to the list of active projects. Click on the Project Name link in the first column to view a list of revisions.

Viewing a list of revisions for a project.

Revisions can be deleted and restored in the same fashion as described above. Note that deleting a revision will prompt all users to update the project the next time they access the Project Designer. Upon update, all transactions associated with the deleted revision will become undone.

Details of the project can be viewed on the Project Info tab.

Viewing the details of a project.

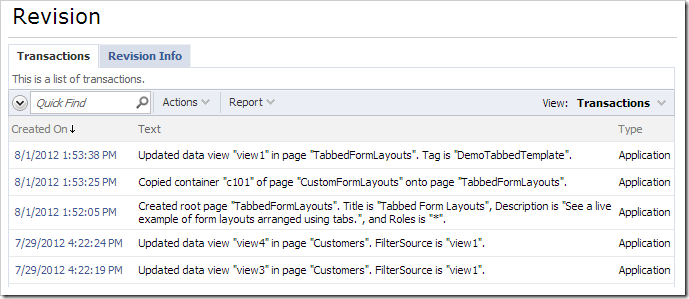
Switch back to the Revisions tab, and click on the revision link in the Created On column. The list of all transactions from the revision will be displayed.

List of transactions.

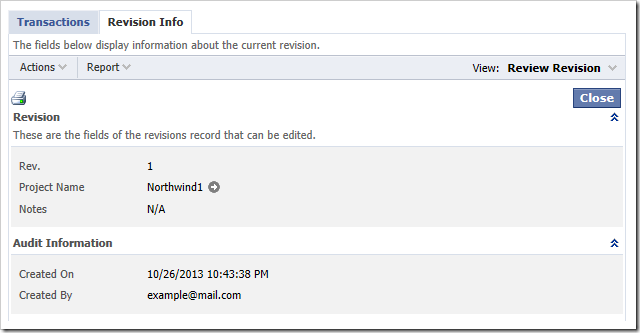
Details of the revision can be seen on the Revision Info tab.

Viewing the details of a revision.

Return to the list of all projects by clicking on the “Projects” link on the menu bar.

Account Manager: Managing Users

$
0
0

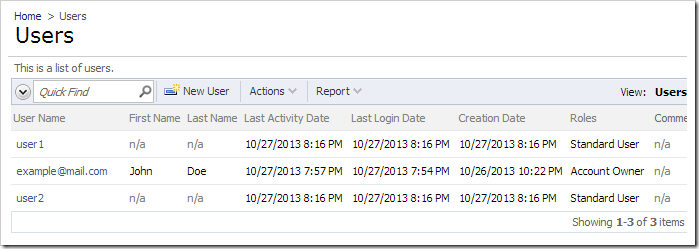
Navigate to http://manage.codeontime.com/pages/users.aspx.

This page displays a list of all users for the account.

The Users page displays a list of users in the current account.

Create a new user by pressing New User on the action bar. Enter a unique user name and a password. Specify the roles that the user will have and projects that they will have permission to access. Finally, enter the email and password question and answer. You may also enter a comment that will only be visible to Account Owners.

Entering the details for a new user.

Press OK to add the user.

Click on the user link in the User Name column when the list of users is displayed. Note that a Personal Activation Code has been assigned to the user. This activation code can be used for the same level of features as the registered purchase. If the user is deactivated or the purchase expires, the personal activation code will stop working.

If a user account is deleted, then the personal activation code will not allow activating the app generator.

Click the Activation Code | Email option on the action bar to email the activation code to the user.

Emailing the activation code to the user's email address.

Select Generate New Code option to assign a new activation code to the user. This will invalidate the original personal activation code.

Note that you cannot have more active users than the number of users allowed for your product edition. Any additional users past the user limit will be created but marked as disabled. Purchase additional product licenses to increase the user limit.

Viewing all 336 articles
Browse latest View live


<script src="https://jsc.adskeeper.com/r/s/rssing.com.1596347.js" async> </script>